Develop your App for the Kyma Environment with Java SDK
Kyma is an application runtime that provides you a flexible and easy way to connect, extend, and customize your applications in the cloud-native world of Kubernetes. Find more details in the official documentation.
While the Kyma runtime is improving over time, recent changes unfortunately rendered parts of this document outdated. We are currently re-evaluating and updating the information provided. Please follow the official documentation.
Workaround for On-Premise Connectivity
Recent changes of the Kyma runtime environment prevent the SAP Cloud SDK's On-Premise connectivity from working as intended. While we are working on a permanent solution, please use the following workaround:
Add following class to your project:
public class OnPremiseHeaderProvider implements DestinationHeaderProvider {@Override@Nonnullpublic List<Header> getHeaders(@Nonnull final DestinationRequestContext requestContext) {final Option<ProxyType> proxyType = requestContext.getDestination().get("ProxyType", ProxyType.class);if (proxyType.getOrElse(ProxyType.INTERNET) != ProxyType.ON_PREMISE) {return Collections.emptyList();}final Option<AuthenticationType> authentication = requestContext.getDestination().get("authentication", AuthenticationType.class);if (authentication.getOrElse(AuthenticationType.NO_AUTHENTICATION) !=AuthenticationType.PRINCIPAL_PROPAGATION) {return Collections.emptyList();}final Try<String> maybeBearerToken = AuthTokenAccessor.tryGetCurrentToken().map(token -> String.format("Bearer %s", token.getJwt().getToken()));if (maybeBearerToken.isEmpty()) {return Collections.emptyList();}return Collections.singletonList(new Header("SAP-Connectivity-Authentication", maybeBearerToken.get()));}}Create following file in your application resources:
src/main/resources/META-INF/com.sap.cloud.sdk.cloudplatform.connectivity.DestinationHeaderProviderFill the file with the fully qualified name of the newly created class. For example, the content should look like this:
name.of.your.package.OnPremiseHeaderProvider
SAP Cloud SDK Features Supported on Kyma by SAP
Find below the list of features we currently support: Legend: ✅ - supported, ❗- partially supported, ❌ - not supported
- ✅ Consume SAP BTP services like Destination, Connectivity, IAS, XSUAA, and others
- ✅ Multitenancy
- ✅ Resilience & Caching
- ✅ Connect to and consume services from SAP S/4HANA Cloud
- ✅ Connect to and consume services from SAP S/4HANA On-Premise
- ✅ Seamless use of typed clients provided by the SAP Cloud SDK
Getting Started with the SAP Cloud SDK on Kyma
This detailed guide will help get your SAP Cloud SDK Java application up and running in Kyma. You can also use this guide to migrate your existing application to Kyma.
Prerequisites
To follow this guide you will need:
- An SAP BTP Kyma environment instance
- Docker and a publicly reachable Docker repository
- A Spring Boot Application using the SAP Cloud SDK
When deploying applications to Kyma, you are not limited to Spring Boot applications. In fact, you may deploy any application that can be executed within a Docker container. The examples in this document, however, do use a Spring Boot app.
Check out the details below in case you are uncertain about any of the prerequisites.
Kyma Environment
This guide assumes you already have a Global Account, a subaccount on SAP BTP platform and have Kubernetes CLI installed on your local machine. If not, please refer to these guides on getting a Global Account and creating a subaccount
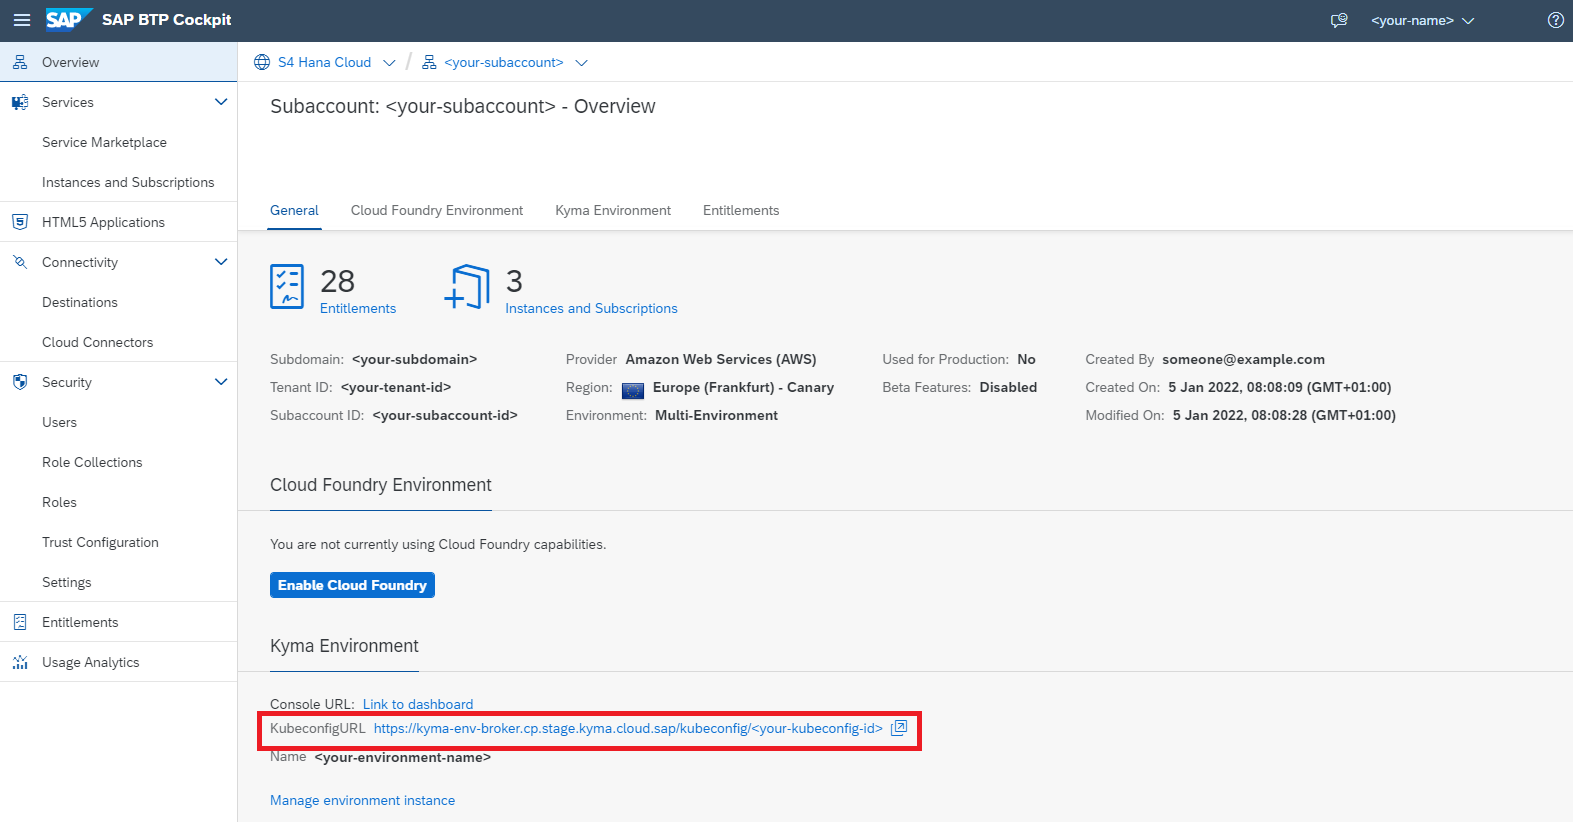
In your subaccount in SAP BTP cockpit, create a Kyma Environment instance. Make sure that you select an appropriate plan and also assign the necessary roles to users.
Creating a Kyma environment instance can take up to 30 minutes.
Once your Kyma environment is created, you can download a Kubeconfig file directly from the SAP BTP cockpit.
Docker
This guide assumes you have Docker installed on your local machine.
Furthermore, you need a Docker repository where you can store images. The repository needs to be publicly accessible in order for the cluster to access and download the Docker image we are going to create.
In case you don't have such a repository yet we recommend either:
- Docker Hub
- Artifactory DMZ (for SAP internal developers)
Access to images in a repository may be limited to authenticated and/or authorized users, depending on your configuration.
Make sure you are logged in to your repository on your local machine by running:
docker login (your-repo) --username=(your-username)
And check your configuration which is usually located under (your-home-directory)/.docker/config.json.
In case AuthN/AuthZ is required to download images make sure you have a secret configured in your cluster
kubectl create secret docker-registry (name-of-the-secret) --docker-username=(username) --docker-password=(API-token) --docker-server=(your-repo)
Application using the SAP Cloud SDK
If you don't have an application already you can comfortably create one from our archetypes.
Containerize the Application
To run on Kyma the application needs to be shipped in a container. For this guide we will be using Docker.
Create a Dockerfile in the project root directory:
FROM openjdk:8-jdk-slim
ARG JAR_FILE=application/target/*.jar
COPY ${JAR_FILE} app.jar
ENTRYPOINT ["java","-jar","/app.jar"]
If needed, update the JAR_FILE to point to your JAR file.
You can find more information on how to containerize Spring Boot applications in this guide (in particular, check the Containerize It section).
Compile and push the image by running:
docker build -t <your-repo>/<your-image-name> .
docker push <your-repo>/<your-image-name>

# alternatively, you may add a tag to your image
docker build -t <your-repo>/<your-image-name>:<your-tag> .
docker push <your-repo>/<your-image-name>:<your-tag>
In case you are facing authorization issues when pushing to your repository refer to the dedicated section under Prerequisites.
Create a Kyma Deployment
-
Create a new YAML file:
deployment.ymlapiVersion: apps/v1kind: Deploymentmetadata:name: my-app-deploymentspec:replicas: 1selector:matchLabels:app: my-apptemplate:metadata:labels:app: my-appspec:containers:# Configure the docker image you just pushed to your repository here- image: <name-of-the-image>name: my-appimagePullPolicy: Alwaysresources:requests:memory: '1.5Gi'cpu: '500m'limits:memory: '2Gi'cpu: '1000m'# Volume mounts needed for injecting SAP BTP service credentialsvolumeMounts:imagePullSecrets:# In case your repository requires a login, reference your secret here- name: <your-secret-for-docker-login>volumes:----apiVersion: v1kind: Servicemetadata:labels:app: my-appname: my-appspec:type: NodePortports:- port: 8080targetPort: 8080protocol: TCPselector:app: my-app -
Install the configuration via
kubectl apply -f path/to/deployment/file/deployment.yml. -
Monitor the status of the deployment by running:
kubectl get deployment my-app-deployment.
Eventually, you should see an output similar to:
kubectl get deployment my-app-deployment

NAME                  READY   UP-TO-DATE   AVAILABLE   AGE
my-app-deployment     1/1     1            1           15s
In case something went wrong use kubectl describe together with deployment or pod to get more information about the status of your application.
Access Your Application
To access your application without further configuration you need to find the name of the application pod by listing out all available pods:
kubectl get pods
Now use the name of the application pod and forward the application port to your local machine:
kubectl port-forward [pod-name] [local-port]:[application-port]
In case you started with an SAP Cloud SDK Archetype, you can test the hello endpoint:
curl localhost:[local-port]/hello
Example
If your application is running on port 8080 (default configuration) in it's pod, you can use the following command to gain access to your app:
kubectl port-forward my-app-pod-XYZ :8080
Please note that we skipped the [local-port] parameter in the command above.
This will let kubectl choose a random available port on your local machine every time you run the command.
If everything worked as expected, you should see an output similar to the following:
Forwarding from 127.0.0.1:50309 -> 8080
Forwarding from [::1]:50309 -> 8080
In this example, kubectl chose the local port 50309.
Hence, you should be able to successfully run the following curl command:
curl localhost:50309/hello
If port-forwarding is not enough for you, you can also get SSH access to your application pods:
kubectl exec --stdin --tty [pod-name] -- /bin/sh
Bind SAP BTP Services to the Application
The SAP Business Technology Platform offers various services that can be used by applications. To access services from a Kyma environment, instances have to be created and bound to the application.
For this guide we'll assume we want to use two services:
- Destination Service
- XSUAA Service
Bind the Destination Service
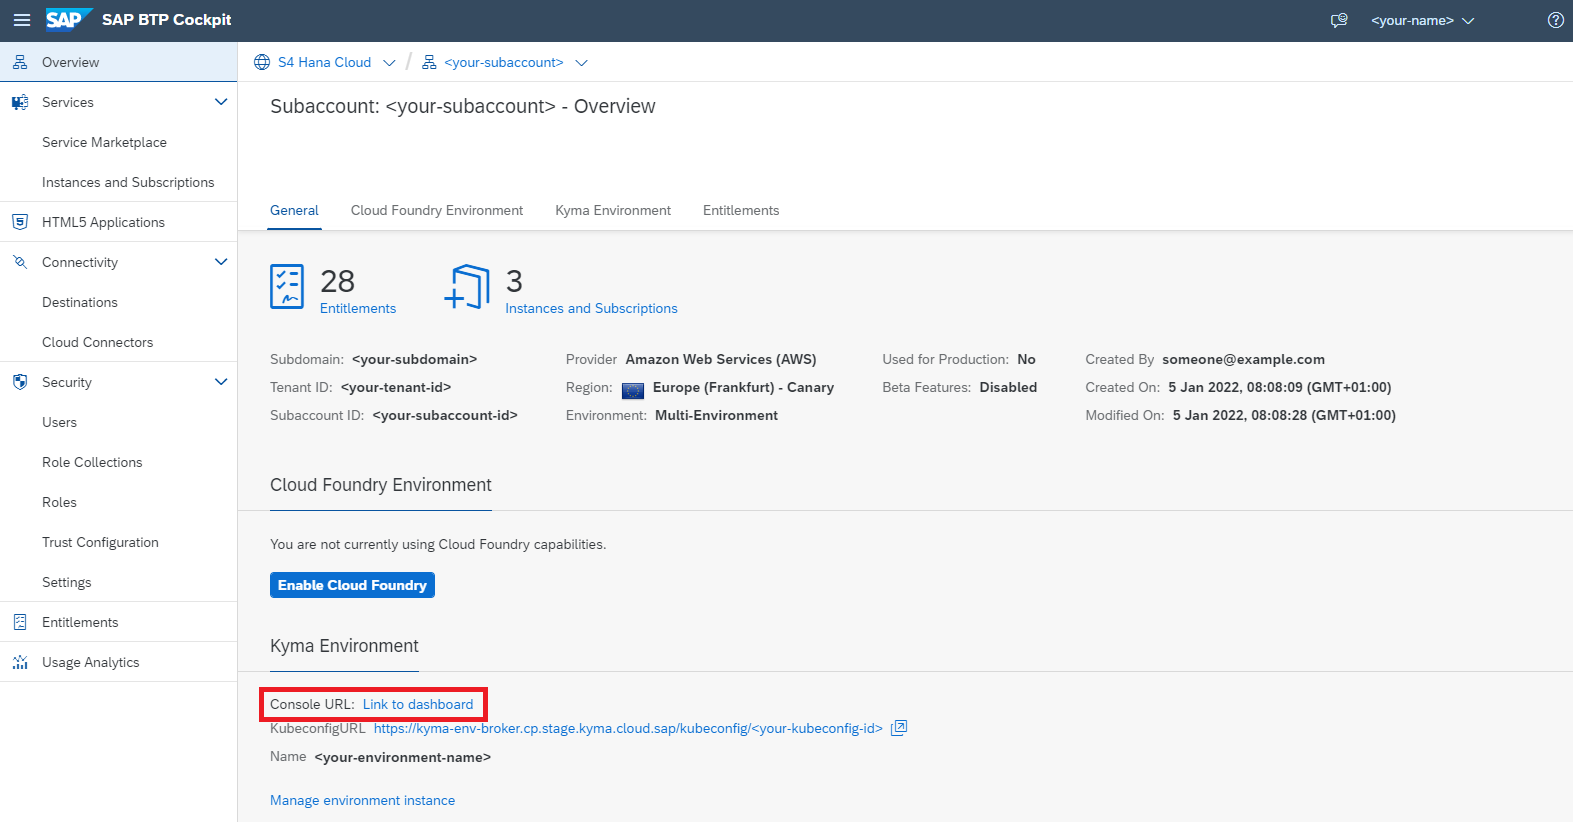
- Open your Kyma dashboard by clicking the link in your SAP BTP cockpit:
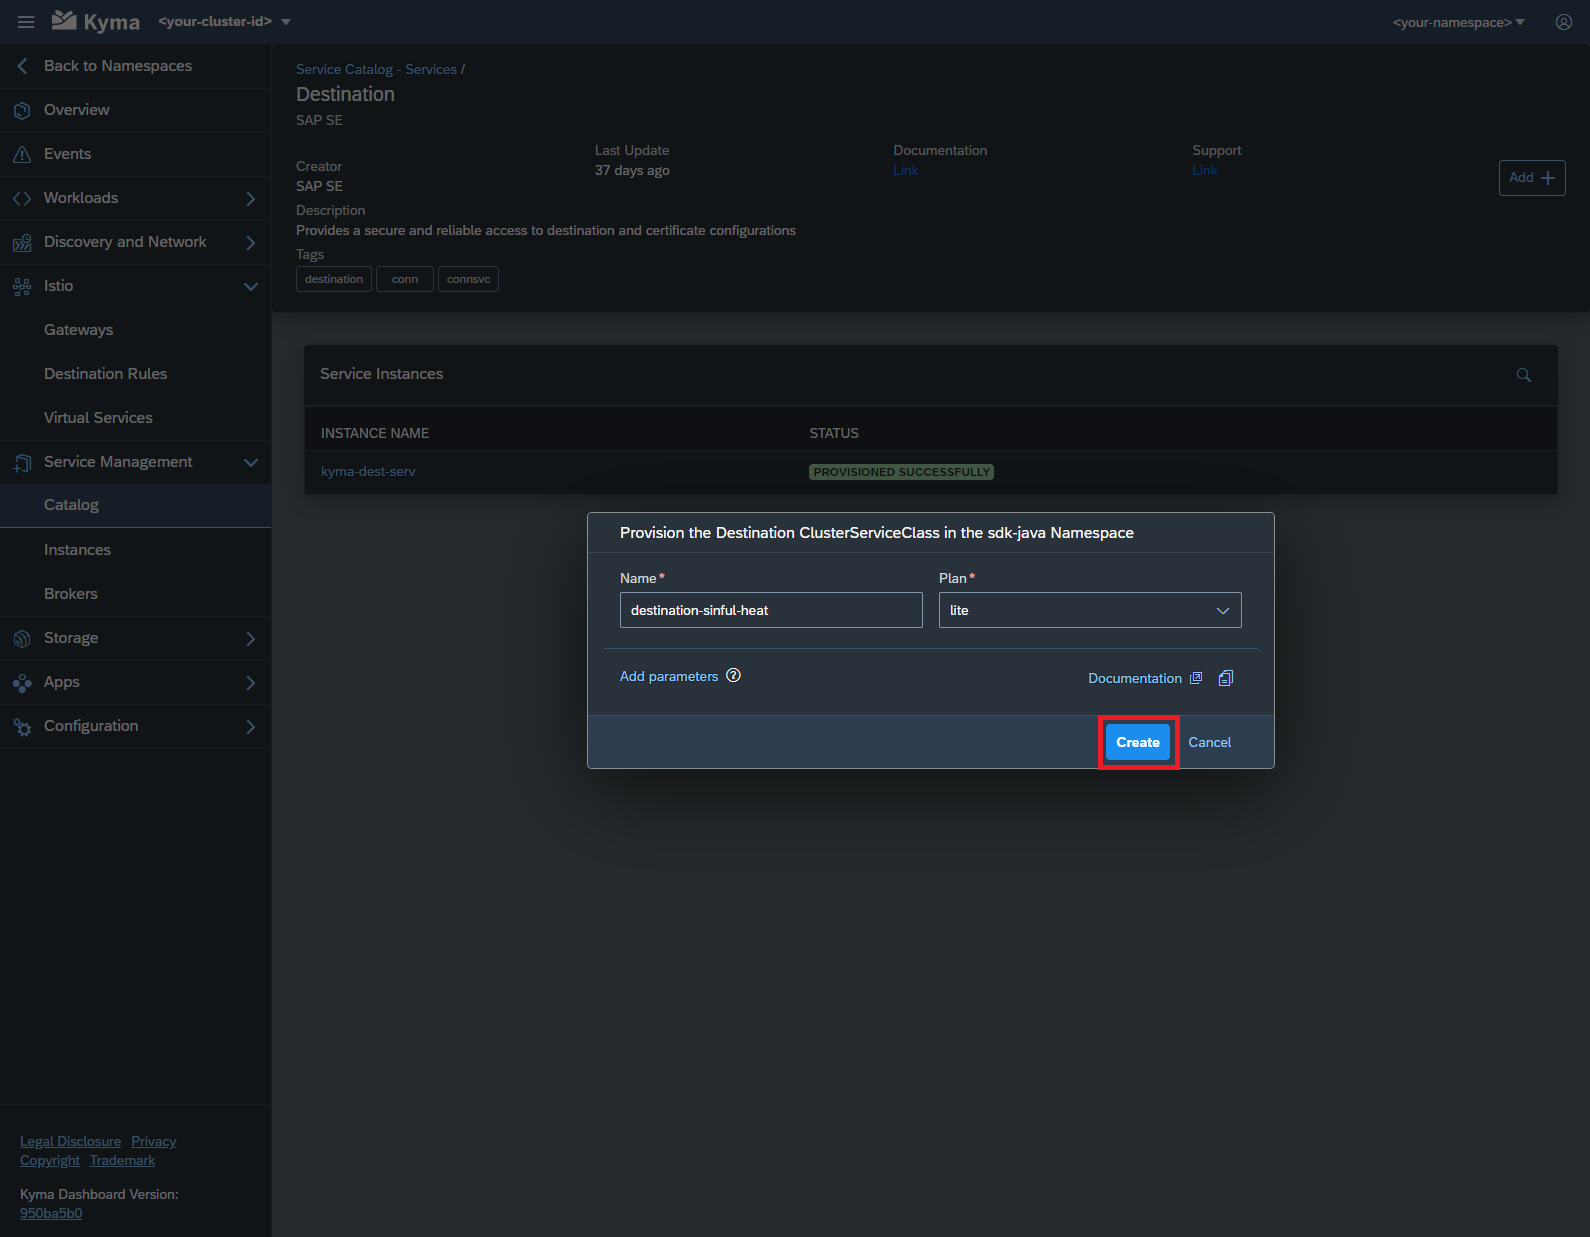
- In the Kyma dashboard, select your Kyma namespace (top right hand side of the screen), navigate to
Service Management > Catalog, and select theDestinationservice.

-
Configure your new service instance by first clicking on the
Add +button followed by selecting both a name and a plan. -
Finalize the service instance creation by confirming your configuration with a click on the
Createbutton.
Alternative: Using Kubernetes Descriptors
- Create a new YAML file :
---
apiVersion: servicecatalog.k8s.io/v1beta1
kind: ServiceInstance
metadata:
  name: destination-service
spec:
  clusterServiceClassExternalName: destination
  clusterServicePlanExternalName: <your-desired-plan>
---
apiVersion: servicecatalog.k8s.io/v1beta1
kind: ServiceBinding
metadata:
  name: my-destination-service-binding
spec:
  instanceRef:
    name: destination-service
  secretName: my-dest-secret
-
Install the configuration via
kubectl apply -f destination-service.yml. -
Monitor the status via
kubectl describe ServiceInstance destination-service. Eventually this should automatically create a Kubernetes secret namedmy-dest-secret. This secret will contain the actual service binding information. -
Mount the
my-dest-secretsecret into the file system of the application as follows:-
Find the empty list of
volumesat the end of yourdeployment.yml. Add a new volume, referencing the secret:volumes:- name: my-destination-service-binding-volumesecret:secretName: my-dest-secret -
Mount this volume into the file system of your application. Add it to the empty list of
volumeMountsin thecontainersection of yourdeployment.yml:volumeMounts:- name: my-destination-service-binding-volumemountPath: '/etc/secrets/sapcp/destination/my-destination-service-binding'readOnly: true
-
-
Update the configuration via
kubectl apply -f deployment.yml.
Bind the XSUAA Service
- Open your Kyma dashboard (see previous section) and select the
Authorization and Trust Management ServiceinService Managament > Catalog:
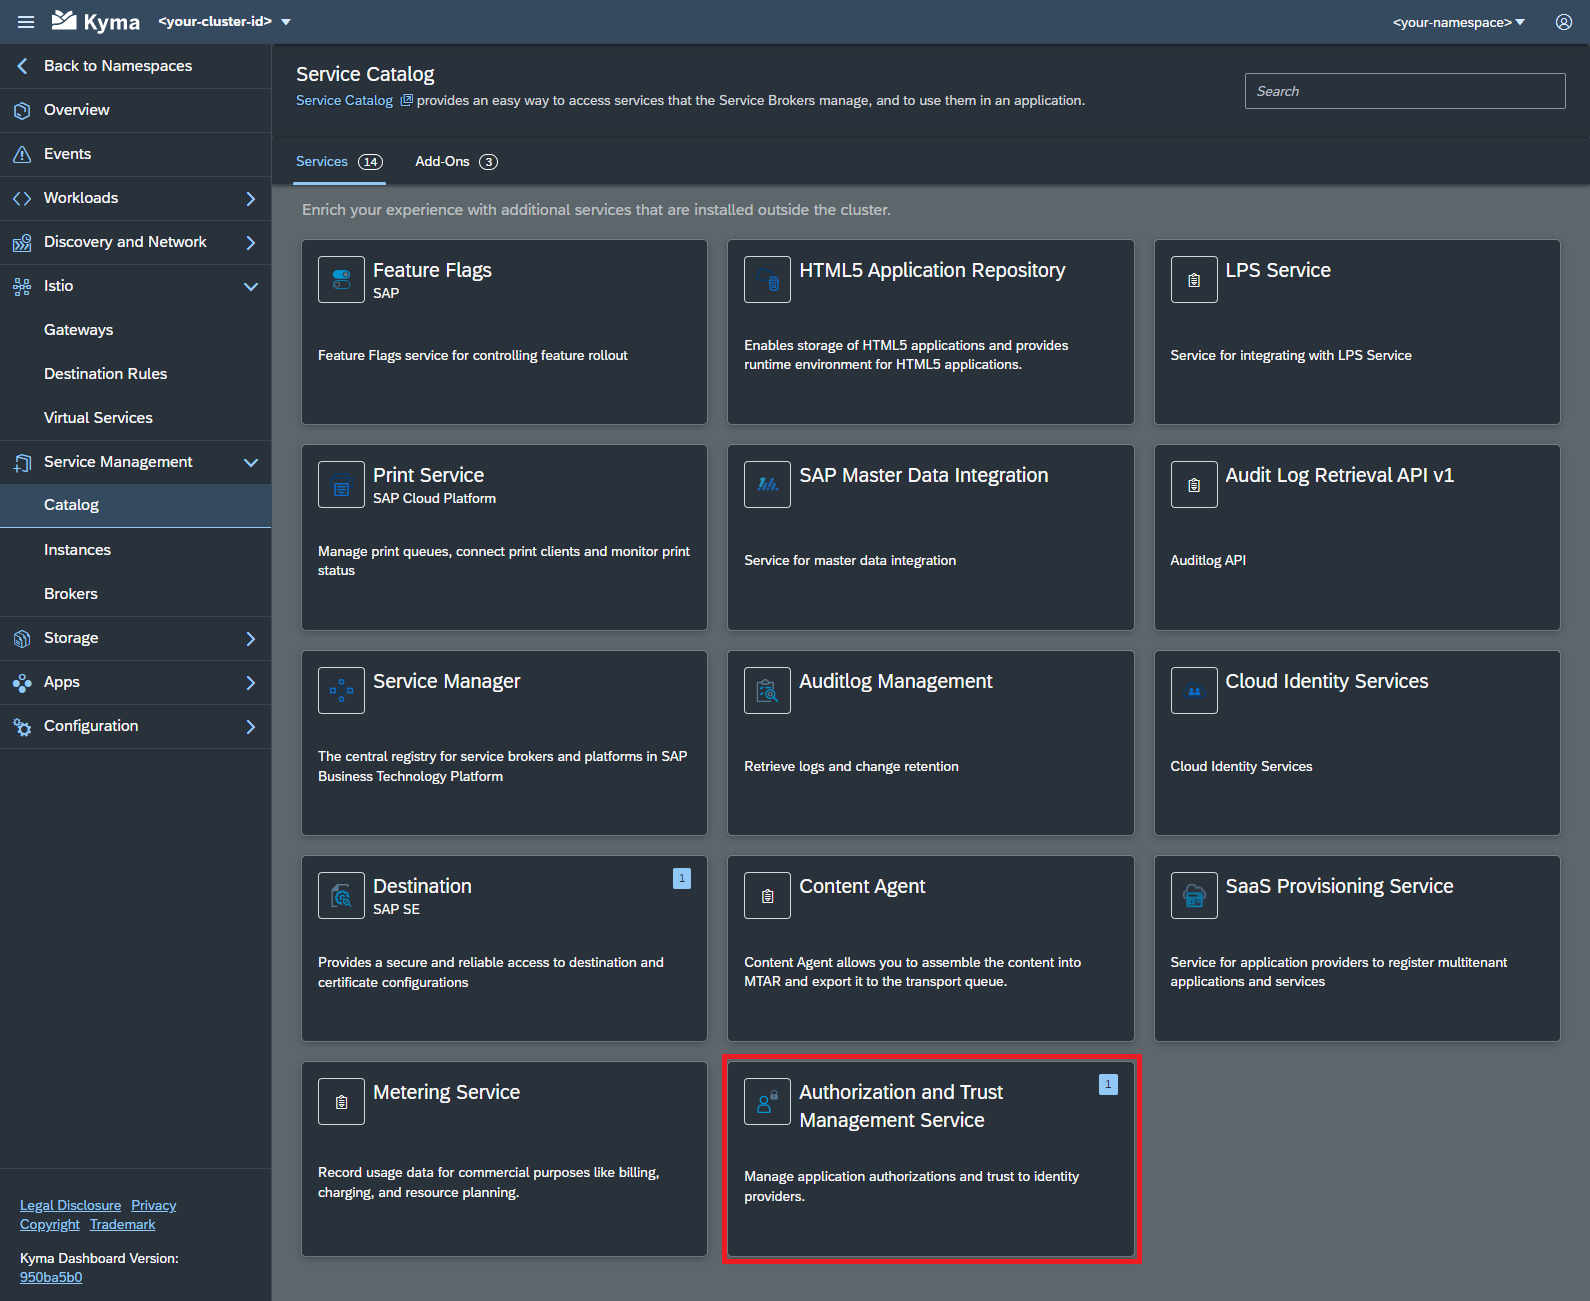
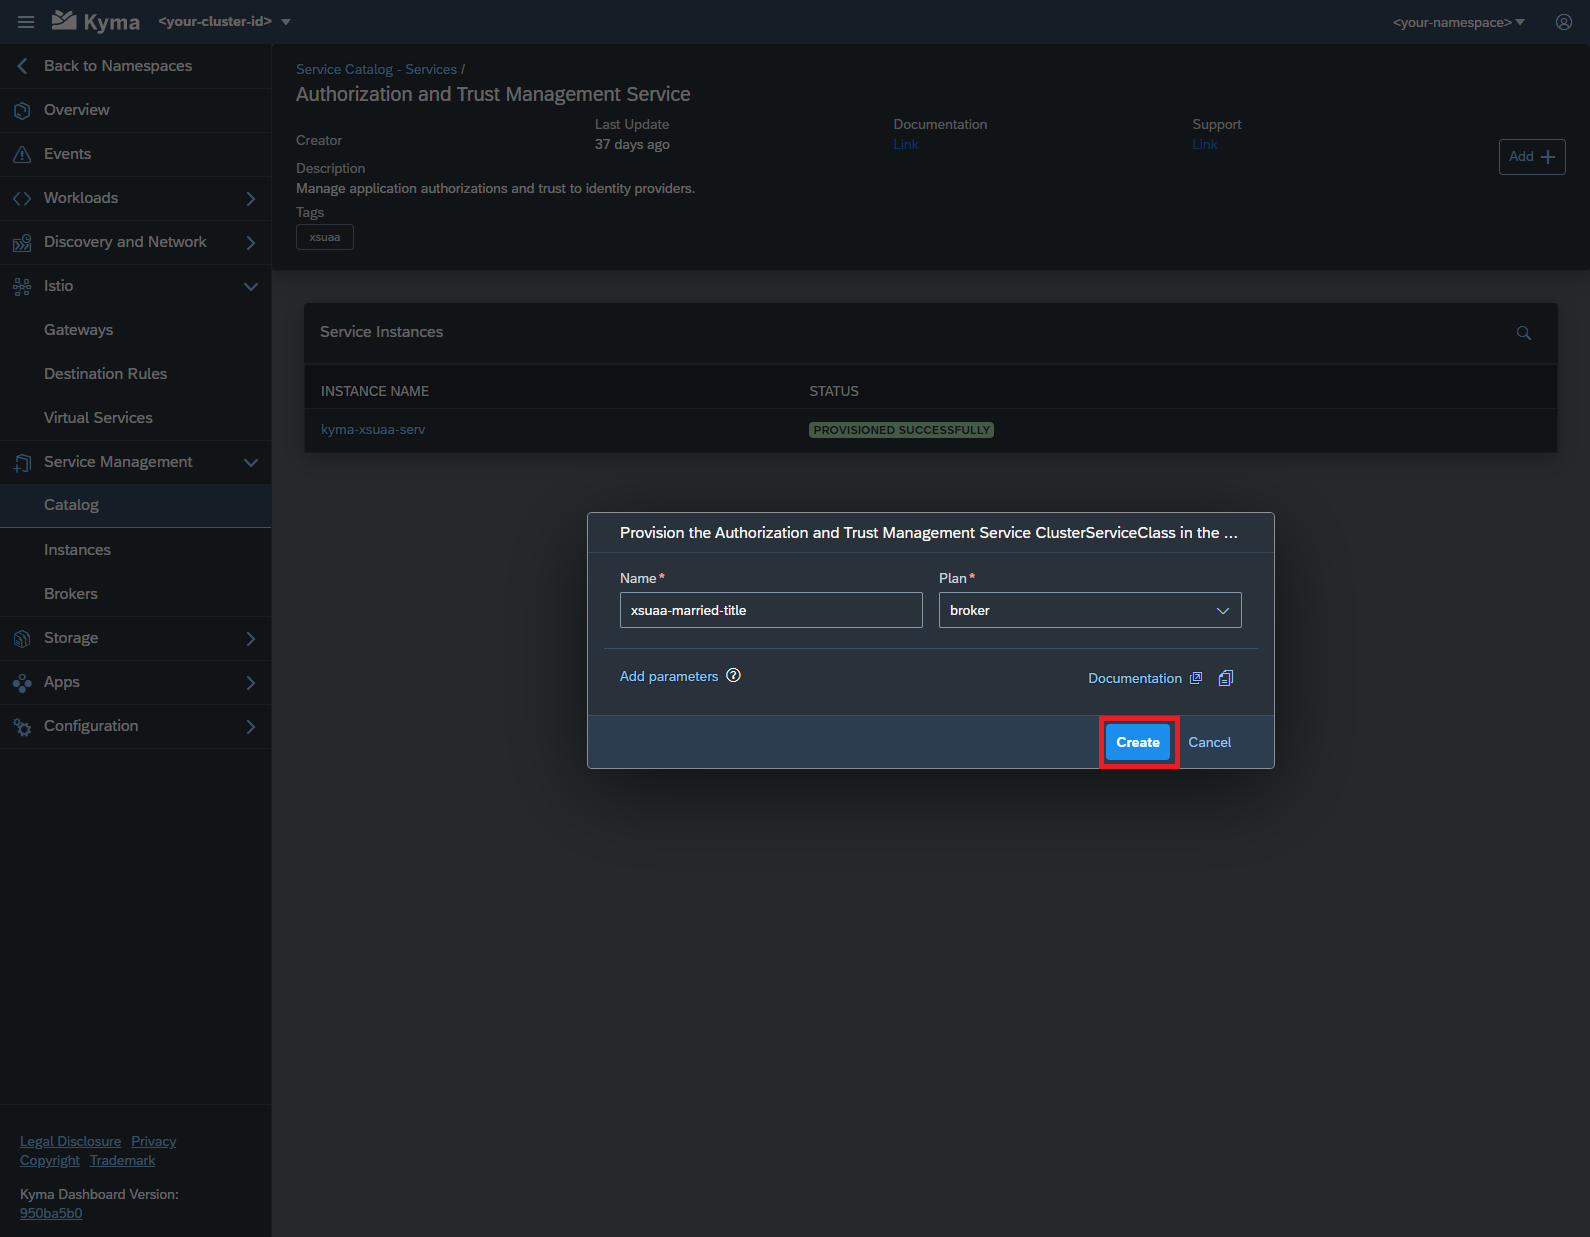
- Configure your new service instance by clicking the
Add +button and selecting both a name and a plan or your new service instance. Complete the process by clicking theCreatebutton.
Alternative: Using Kubernetes Descriptors
- Create a new YAML file :
---
apiVersion: servicecatalog.k8s.io/v1beta1
kind: ServiceInstance
metadata:
  name: xsuaa-service
spec:
  clusterServiceClassExternalName: xsuaa
  clusterServicePlanExternalName: <your-desired-plan>
---
apiVersion: servicecatalog.k8s.io/v1beta1
kind: ServiceBinding
metadata:
  name: my-xsuaa-service-binding
spec:
  instanceRef:
    name: xsuaa-service
  secretName: my-xsuaa-secret
- Repeat the same steps 2-5 from the previous section but make use of
my-xsuaa-secretfor the steps.
Known XSUAA Service Incompatibility
We have observed that the property plan is missing in the XSUAA secret created in the previous section.
This property, however, is required by the SAP Cloud SDK and it's absence causes runtime errors in the application while trying to read this service binding.
To fix this issue you need to edit the secret so that it contains the plan property.
The easiest way, when you are already using the CLI, is by using the kubectl edit command:
kubectl edit secrets my-xsuaa-secret
In there, you can now add a plan property with one of the following base64 encoded values:
| plan | base64 encoded value |
|---|---|
application | YXBwbGljYXRpb24K |
broker | YnJva2VyCg== |
space | c3BhY2UK |
apiaccess | YXBpYWNjZXNzCg== |
The resulting service binding can now be consumed with the SAP Cloud SDK.
Expose your Application to the Internet
During the next steps, you will configure and deploy an approuter so that only authenticated users can access your application. For that, you will need to create a simple application that uses the @sap/approuter and starts it for this purpose.
-
Based on the approuter application you used, containerize your application and push the image to a docker repository of your choice.
-
Create a new YAML file describing the approuter deployment:
deployment.ymlapiVersion: apps/v1kind: Deploymentmetadata:name: my-approuter-deploymentlabels:app: my-approuterspec:replicas: 1selector:matchLabels:app: my-approutertemplate:metadata:labels:app: my-approuterspec:imagePullSecrets:- name: <your-secret-for-docker-login>containers:# Configure the docker image of your approuter application here- image: <name-of-the-image>imagePullPolicy: Alwaysname: my-approuterenv:- name: PORTvalue: '5000'- name: destinationsvalue: >[{"name": "<name-for-the-backend-app>","url": "<URL-to-access-backend-app>","forwardAuthToken": true}]- name: TENANT_HOST_PATTERNvalue: <URL-pattern-for-outside-cluster-access>volumeMounts:- name: my-xsuaa-service-binding-volumemountPath: '/etc/secrets/sapcp/xsuaa/my-xsuaa-service-binding'volumes:- name: my-xsuaa-service-binding-volumesecret:secretName: my-xsuaa-secretrestartPolicy: Always---apiVersion: v1kind: Servicemetadata:labels:app: my-approutername: my-approuterspec:type: NodePortports:- port: 5000targetPort: 5000protocol: TCPnodePort: 31002selector:app: my-approuter -
Also adapt the
xs-app.jsonfile:
{
    "welcomeFile": "/web-pages/index.html",
    "routes": [
        {
            "source": "/<path-for-backend-endpoints>/(.*)",
            "target": "$1",
            "destination": "<name-for-the-backend-app>",
            "identityProvider": "<optional-identity-provider-id>",
            "csrfProtection": false
        }
    ]
}
-
Follow steps similar to steps 2-3 in Create a Kyma Deployment section to deploy the approuter and check if the deployment is successful.
-
Update the already created XSUAA service instance with few parameters like
xsappnameandoauth2-configuration. This is required to provide authenticated access to backend application via the approuter.
---
apiVersion: servicecatalog.k8s.io/v1beta1
kind: ServiceInstance
metadata:
  name: xsuaa-service
spec:
  clusterServiceClassExternalName: xsuaa
  clusterServicePlanExternalName: <your-desired-plan>
  parameters:
    xsappname: <your-backend-app-name>
    oauth2-configuration:
      allowedproviders:
        - <your-idp-key>
      redirect-uris:
        - <URL-pattern-for-outside-cluster-access>
---
apiVersion: servicecatalog.k8s.io/v1beta1
kind: ServiceBinding
metadata:
  name: my-xsuaa-service-binding
spec:
  instanceRef:
    name: xsuaa-service
  secretName: my-xsuaa-secret
-
Update the configuration via
kubectl apply -f xsuaa-service.yaml. -
Make the approuter accessible outside the cluster by creating an API rule:
apiVersion: gateway.kyma-project.io/v1alpha1
kind: APIRule
metadata:
  name: <your-rule-name>
spec:
  gateway: kyma-gateway.kyma-system.svc.cluster.local
  rules:
    - accessStrategies:
        - config: {}
          handler: noop
      methods:
        - GET
      path: /.*
  service:
    host: <subaccount-prefix>.<URL-pattern-for-outside-cluster-access>
    name: my-approuter
    port: 5000
-
Update the configuration via
kubectl apply -f create-api-rule.yml. -
Finally, access the application by using the host address provided in the API rule created and appending the
path-for-backend-endpointsgiven inxs-app.jsonalong with the an actual end point of your backend application.
You need not necessarily push an Approuter to access your application outside a cluster. You could also go ahead and expose the service for your application directly by creating an APIRule. But, this would mean that access to your application would not be authenticated first.
You can also refer to this additional material available for getting started with SAP Cloud SDK on Kyma: