Develop your App for the Kyma Environment with Java SDK
Kyma is an application runtime that provides you a flexible and easy way to connect, extend, and customize your applications in the cloud-native world of Kubernetes. Find more details in the official documentation.
You can also refer to this additional material available for getting started with SAP Cloud SDK on Kyma:
- Sample Application with Setup Guide
- Blog Post on a Sample Use Case
- Using the Service Catalog with the SAP Cloud SDK
SAP Cloud SDK Features Supported on Kyma by SAP
The SAP Cloud SDK supports the Kyma runtime through the regular Cloud Foundry specific modules and classes. Hence, Cloud Foundry application developers usually don't need to adjust their code to deploy and run it on Kyma.
Nevertheless, before deploying your application on a Kyma cluster, please ensure that following dependency is on the classpath: com.sap.cloud.environment.servicebinding:java-sap-service-operator.
Find below the list of features we currently support: Legend: ✅ - supported, ❗- partially supported, ❌ - not supported
- ✅ Consume SAP BTP services like Destination, Connectivity, IAS, XSUAA, and others
- ✅ Multitenancy
- ✅ Resilience & Caching
- ✅ Connect to and consume services from SAP S/4HANA Cloud
- ❗ Connect to and consume services from SAP S/4HANA On-Premise
- ✅ Seamless use of typed clients provided by the SAP Cloud SDK
Getting Started with the SAP Cloud SDK on Kyma
This detailed guide will help get your SAP Cloud SDK Java application up and running in Kyma. You can also use this guide to migrate your existing application to Kyma.
Prerequisites
To follow this guide you will need:
- An SAP BTP Kyma environment instance
- Docker and a publicly reachable Docker repository
- A Spring Boot Application using the SAP Cloud SDK
When deploying applications to Kyma, you are not limited to Spring Boot applications. In fact, you may deploy any application that can be executed within a Docker container. The examples in this document, however, do use a Spring Boot app.
Check out the details below in case you are uncertain about any of the prerequisites.
Kyma Environment
This guide assumes you already have a Global Account, a subaccount on SAP BTP platform and have Kubernetes CLI installed on your local machine. If not, please refer to these guides on getting a Global Account and creating a subaccount
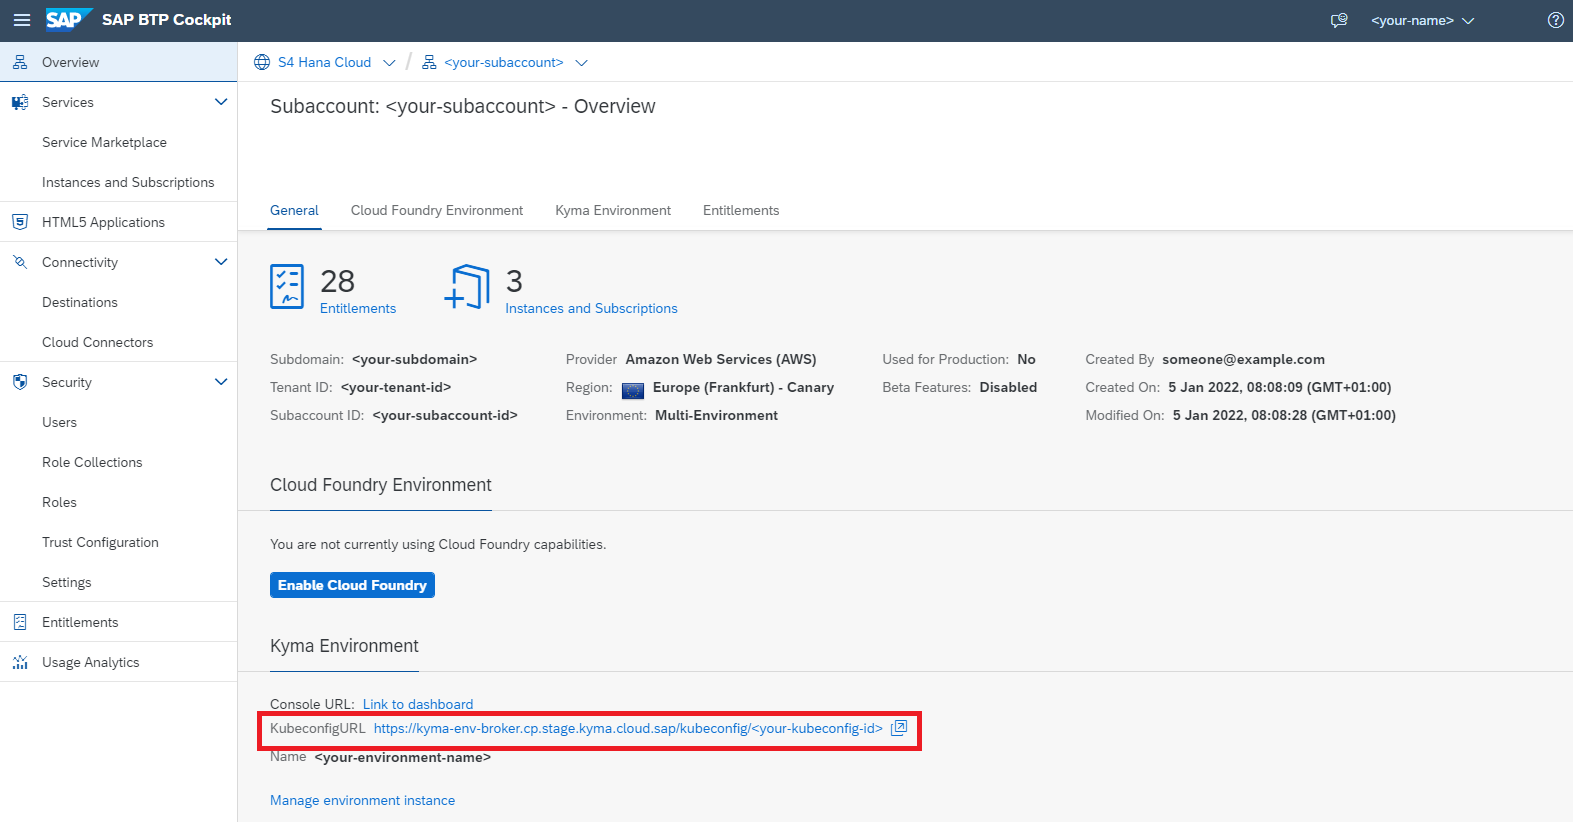
In your subaccount in SAP BTP cockpit, create a Kyma Environment instance. Make sure that you select an appropriate plan and also assign the necessary roles to users.
Creating a Kyma environment instance can take up to 30 minutes.
Once your Kyma environment is created, you can download a Kubeconfig file directly from the SAP BTP cockpit.
Docker
This guide assumes you have Docker installed on your local machine.
Furthermore, you need a Docker repository where you can store images. The repository needs to be publicly accessible in order for the cluster to access and download the Docker image we are going to create.
In case you don't have such a repository yet we recommend either:
- Docker Hub
- Artifactory DMZ (for SAP internal developers)
Access to images in a repository may be limited to authenticated and/or authorized users, depending on your configuration.
Make sure you are logged in to your repository on your local machine by running:
docker login (your-repo) --username=(your-username)
And check your configuration which is usually located under (your-home-directory)/.docker/config.json.
In case AuthN/AuthZ is required to download images make sure you have a secret configured in your cluster
kubectl create secret docker-registry (name-of-the-secret) --docker-username=(username) --docker-password=(API-token) --docker-server=(your-repo)
Application using the SAP Cloud SDK
If you don't have an application already you can comfortably create one from our archetypes.
Containerize the Application
To run on Kyma the application needs to be shipped in a container. For this guide we will be using Docker.
Create a Dockerfile in the project root directory:
FROM openjdk:17-jdk-slim
ARG JAR_FILE=application/target/*.jar
COPY ${JAR_FILE} app.jar
ENTRYPOINT ["java","-jar","/app.jar"]
If needed, update the JAR_FILE to point to your JAR file.
You can find more information on how to containerize Spring Boot applications in this guide (in particular, check the Containerize It section).
Compile and push the image by running:
docker build -t <your-repo>/<your-image-name> .
docker push <your-repo>/<your-image-name>

# alternatively, you may add a tag to your image
docker build -t <your-repo>/<your-image-name>:<your-tag> .
docker push <your-repo>/<your-image-name>:<your-tag>
In case you are facing authorization issues when pushing to your repository refer to the dedicated section under Prerequisites.
Create a Kyma Deployment
-
Create a new YAML file:
deployment.ymlapiVersion: apps/v1kind: Deploymentmetadata:name: my-app-deploymentspec:replicas: 1selector:matchLabels:app: my-apptemplate:metadata:labels:app: my-appspec:containers:# Configure the docker image you just pushed to your repository here- image: <name-of-the-image>name: my-appimagePullPolicy: Alwaysresources:requests:memory: '1.5Gi'cpu: '500m'limits:memory: '2Gi'cpu: '1000m'# Volume mounts needed for injecting SAP BTP service credentialsvolumeMounts:env:- name: SERVICE_BINDING_ROOTvalue: "/etc/secrets/sapbtp"imagePullSecrets:# In case your repository requires a login, reference your secret here- name: <your-secret-for-docker-login>volumes:----apiVersion: v1kind: Servicemetadata:labels:app: my-appname: my-appspec:type: NodePortports:- port: 8080targetPort: 8080protocol: TCPselector:app: my-app -
Install the configuration via
kubectl apply -f path/to/deployment/file/deployment.yml. -
Monitor the status of the deployment by running:
kubectl get deployment my-app-deployment.
Eventually, you should see an output similar to:
kubectl get deployment my-app-deployment

NAME                  READY   UP-TO-DATE   AVAILABLE   AGE
my-app-deployment     1/1     1            1           15s
In case something went wrong use kubectl describe together with deployment or pod to get more information about the status of your application.
Access Your Application
To access your application without further configuration you need to find the name of the application pod by listing out all available pods:
kubectl get pods
Now use the name of the application pod and forward the application port to your local machine:
kubectl port-forward [pod-name] [local-port]:[application-port]
In case you started with an SAP Cloud SDK Archetype, you can test the hello endpoint:
curl localhost:[local-port]/hello
Example
If your application is running on port 8080 (default configuration) in it's pod, you can use the following command to gain access to your app:
kubectl port-forward my-app-pod-XYZ :8080
Please note that we skipped the [local-port] parameter in the command above.
This will let kubectl choose a random available port on your local machine every time you run the command.
If everything worked as expected, you should see an output similar to the following:
Forwarding from 127.0.0.1:50309 -> 8080
Forwarding from [::1]:50309 -> 8080
In this example, kubectl chose the local port 50309.
Hence, you should be able to successfully run the following curl command:
curl localhost:50309/hello
If port-forwarding is not enough for you, you can also get SSH access to your application pods:
kubectl exec --stdin --tty [pod-name] -- /bin/sh
Bind SAP BTP Services to the Application
The SAP Business Technology Platform offers various services that can be used by applications. To access services from a Kyma environment, instances have to be created and bound to the application.
For this guide we'll assume we want to use two services:
- Destination Service
- XSUAA Service
Create and Bind the Destination Service
-
Open your Kyma dashboard and select the namespace of your application (top right hand side of the screen) and navigate to
Service Management > Service Instances. -
Create a new service instance by first clicking on the
+ Create Service Instancebutton.Choose a name for the instance, then enter
destinationas offering name andliteas plan.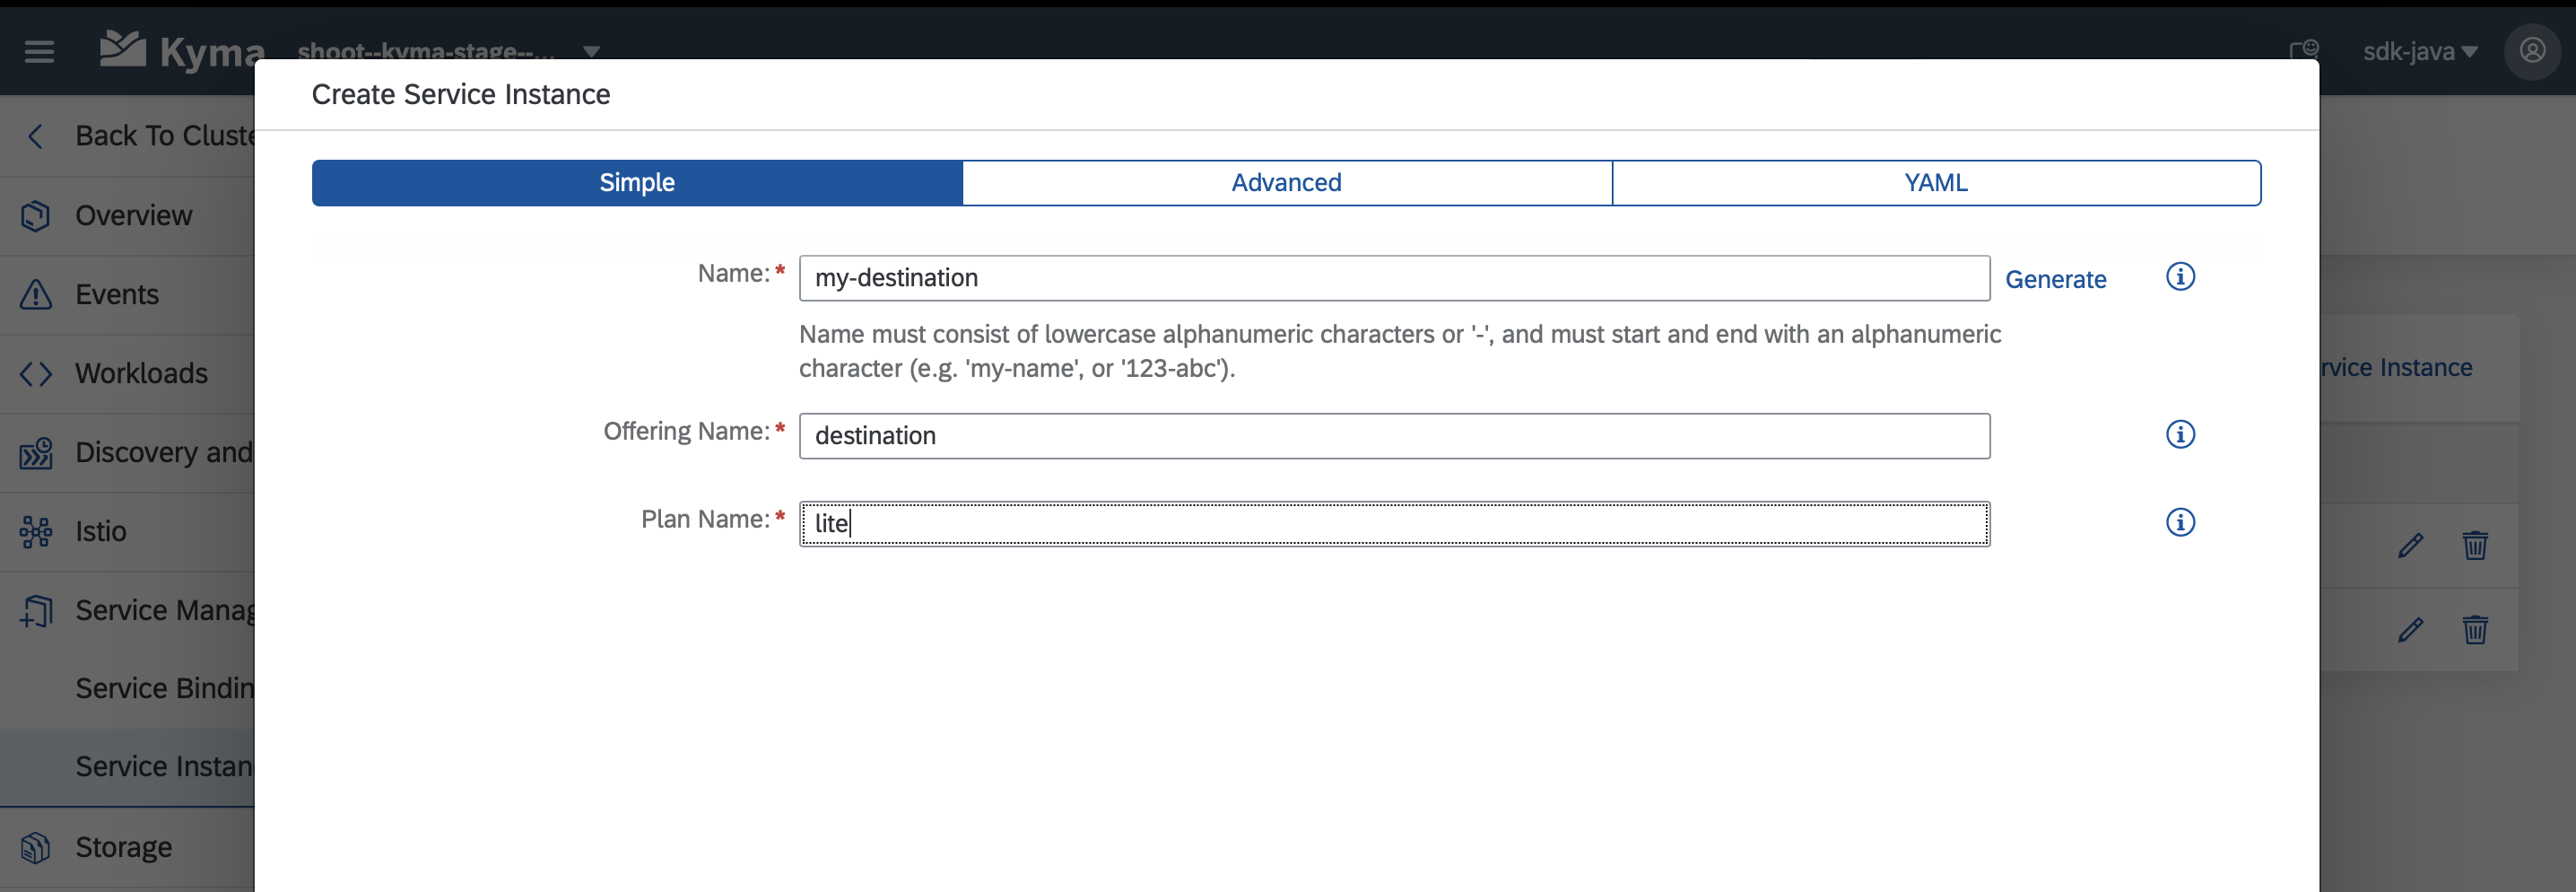
-
Finalize the service instance creation by confirming your configuration with a click on the
Createbutton.Save the configuration as YAMLIf you prefer to maintain your configration as code you can copy the resulting YAML into your project.
-
Navigate to
Service Management > Service Bindingsand create a binding for the service instance you just created.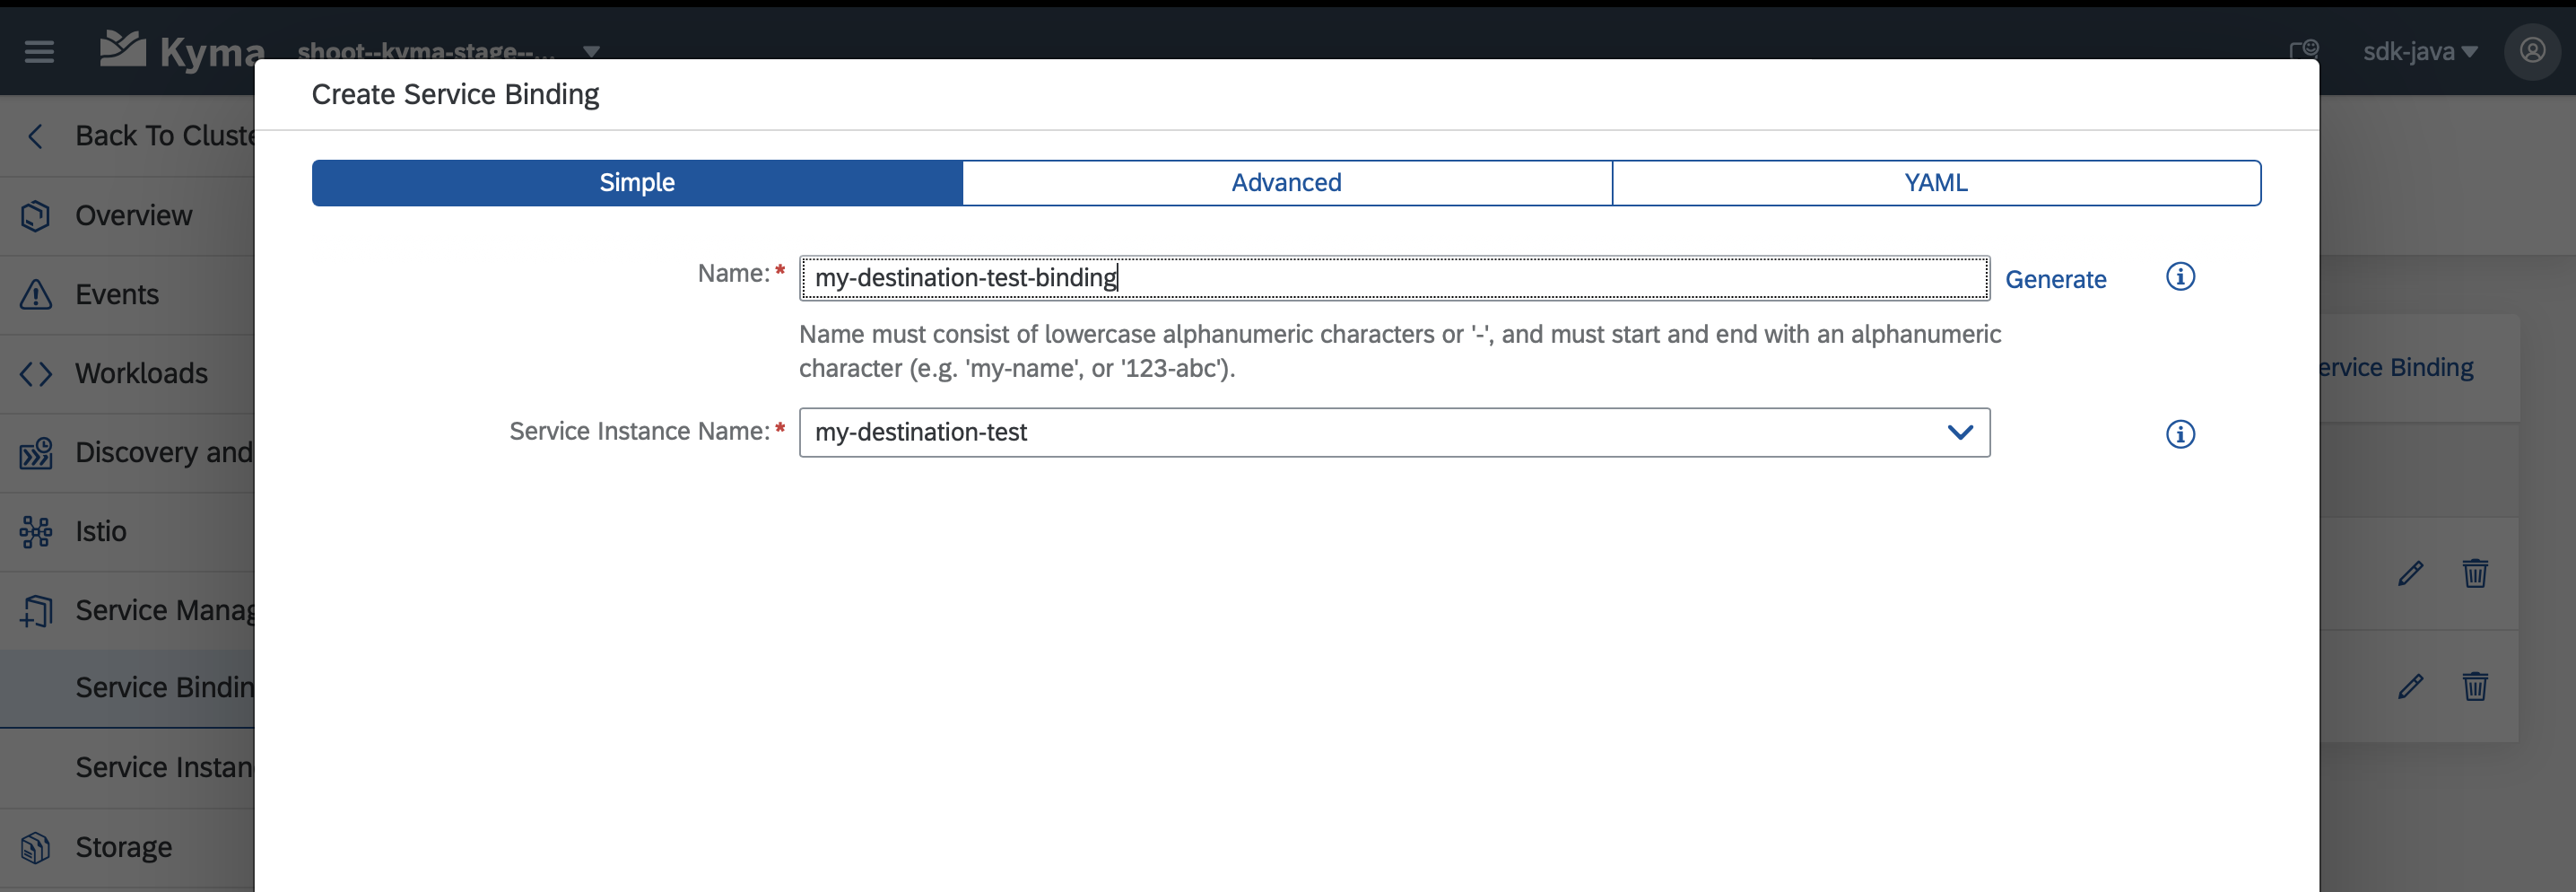
Make sure to provide a meaningful name to the binding as it will also be used for the created secret, which is needed for the next step.
-
The automatically created secret (derived from the service binding) needs to be mounted to the file system of your application pods. Open your
deployment.ymland add the following content:-
Find the empty list of
volumesin yourdeployment.yml. Add a new volume, referencing the secret:volumes:- name: my-destination-service-binding-volumesecret:secretName: <the name of your binding goes here> -
Mount this volume into the file system of your application. Add it to the empty list of
volumeMountsin thecontainersection of yourdeployment.yml:volumeMounts:- name: my-destination-service-binding-volumemountPath: '/etc/secrets/sapbtp/my-destination-service-binding'readOnly: true
-
-
Apply the changes to your deployment by running
kubectl apply -f deployment.yml.
Bind the XSUAA Service
Apply the same steps as for the destination service, but use the following values when creating the service instance:
- Offering Name:
xsuaa - Plan:
application
Here is an example of what the YAML for the service instance and service binding might look like:
apiVersion: services.cloud.sap.com/v1
kind: ServiceInstance
metadata:
  name: my-xsuaa
  labels:
    app.kubernetes.io/name: my-xsuaa
  annotations: {}
  namespace: sdk-java
spec:
  serviceOfferingName: xsuaa
  servicePlanName: application
---
apiVersion: services.cloud.sap.com/v1
kind: ServiceBinding
metadata:
  name: my-xsuaa-binding
  labels:
    app.kubernetes.io/name: my-xsuaa-binding
  annotations: {}
  namespace: sdk-java
spec:
  serviceInstanceName: kyma-xsuaa-serv
Expose your Application to the Internet
During the next steps, you will configure and deploy an approuter so that only authenticated users can access your application. For that, you will need to create a simple application that uses the @sap/approuter and starts it for this purpose.
-
Based on the approuter application you used, containerize your application and push the image to a docker repository of your choice.
-
Create a new YAML file describing the approuter deployment:
deployment.ymlapiVersion: apps/v1kind: Deploymentmetadata:name: my-approuter-deploymentlabels:app: my-approuterspec:replicas: 1selector:matchLabels:app: my-approutertemplate:metadata:labels:app: my-approuterspec:imagePullSecrets:- name: <your-secret-for-docker-login>containers:# Configure the docker image of your approuter application here- image: <name-of-the-image>imagePullPolicy: Alwaysname: my-approuterenv:- name: PORTvalue: '5000'- name: destinationsvalue: >[{"name": "<name-for-the-backend-app>","url": "<URL-to-access-backend-app>","forwardAuthToken": true}]- name: TENANT_HOST_PATTERNvalue: <URL-pattern-for-outside-cluster-access>volumeMounts:- name: my-xsuaa-service-binding-volumemountPath: '/etc/secrets/sapcp/xsuaa/my-xsuaa-service-binding'volumes:- name: my-xsuaa-service-binding-volumesecret:secretName: my-xsuaa-secretrestartPolicy: Always---apiVersion: v1kind: Servicemetadata:labels:app: my-approutername: my-approuterspec:type: NodePortports:- port: 5000targetPort: 5000protocol: TCPnodePort: 31002selector:app: my-approuter -
Also adapt the
xs-app.jsonfile:
{
    "welcomeFile": "/web-pages/index.html",
    "routes": [
        {
            "source": "/<path-for-backend-endpoints>/(.*)",
            "target": "$1",
            "destination": "<name-for-the-backend-app>",
            "identityProvider": "<optional-identity-provider-id>",
            "csrfProtection": false
        }
    ]
}
-
Follow steps similar to steps 2-3 in Create a Kyma Deployment section to deploy the approuter and check if the deployment is successful.
-
Update the already created XSUAA service instance with few parameters like
xsappnameandoauth2-configuration. This is required to provide authenticated access to backend application via the approuter.
---
apiVersion: servicecatalog.k8s.io/v1beta1
kind: ServiceInstance
metadata:
  name: xsuaa-service
spec:
  clusterServiceClassExternalName: xsuaa
  clusterServicePlanExternalName: <your-desired-plan>
  parameters:
    xsappname: <your-backend-app-name>
    oauth2-configuration:
      allowedproviders:
        - <your-idp-key>
      redirect-uris:
        - <URL-pattern-for-outside-cluster-access>
---
apiVersion: servicecatalog.k8s.io/v1beta1
kind: ServiceBinding
metadata:
  name: my-xsuaa-service-binding
spec:
  instanceRef:
    name: xsuaa-service
  secretName: my-xsuaa-secret
-
Update the configuration via
kubectl apply -f xsuaa-service.yaml. -
Make the approuter accessible outside the cluster by creating an API rule:
apiVersion: gateway.kyma-project.io/v1alpha1
kind: APIRule
metadata:
  name: <your-rule-name>
spec:
  gateway: kyma-gateway.kyma-system.svc.cluster.local
  rules:
    - accessStrategies:
        - config: {}
          handler: noop
      methods:
        - GET
      path: /.*
  service:
    host: <subaccount-prefix>.<URL-pattern-for-outside-cluster-access>
    name: my-approuter
    port: 5000
-
Update the configuration via
kubectl apply -f create-api-rule.yml. -
Finally, access the application by using the host address provided in the API rule created and appending the
path-for-backend-endpointsgiven inxs-app.jsonalong with the an actual end point of your backend application.
You need not necessarily push an Approuter to access your application outside a cluster. You could also go ahead and expose the service for your application directly by creating an APIRule. But, this would mean that access to your application would not be authenticated first.
On-Premise Connectivity
Prerequisites
This guide assumes you have both the Transparent Proxy (version >= 1.4.0) and Connectivity Proxy (version >= 2.11.0) installed in your cluster.
For Kyma, the Transparent Proxy is available as a module that can be added as described here.
For Kyma, the Conectivity Proxy is available as a module that can be added as described here.
(optional) The Connectivity Proxy can alternatively be installed in untrusted mode as described here.
On Kyma, two scenarios are supported by the SAP Cloud SDK:
- Using the Connecitivty Proxy together with the Transparent Proxy
- Using a custom Connecitivty Proxy instance in "untrusted mode" without the Transparent Proxy
The Connecitivty Proxy module in Kyma is coming in "trusted mode", thus this guide covers scenario (1). In case you want to run scenario (2) refer to this guide for using the Connectivity Proxy without Transparent Proxy. Other scenarios are currently not supported.
Background Information
When using the Transparent Proxy, your app performs requests against the Transparent Proxy without explicit authentication, relying on the secure network communication provided by Kyma via Istio. The Transparent Proxy will obtain the relevant destination from the SAP Destination service and use it to forward the request via the Connectivity Proxy to the On-Premise system. Consequently, your app itself does not interact with Destination or Connectivity services at all and thus your application pods do not require bindings to these two services.
Please note that the current implementation of the Transparent Proxy does not yet cover all use cases.
Constraints when using the Transparent Proxy
- Private Link not yet supported
This approach is conceptually different from what you may be used to from a CloufdFoundry environment. The official documentation of the Transparent Proxy gives more information on the architecture.
Create a Kubernetes Resource
You can either configure connectivity to individual destinations, or for arbitrary destinations in your destination service instance or subaccount (via Destination Gateway).
- Individual Destination
- Destination Gateway
Given you have created a destination with the name my-destination in the SAP BTP Cockpit, create the following YAML file:
apiVersion: destination.connectivity.api.sap/v1
kind: Destination
metadata:
  name: my-destination
spec:
  destinationRef:
    name: 'my-destination'
  destinationServiceInstanceName: dest-service-instance-example # can be ommited if config.destinationService.defaultInstanceName was provided to the helm chart of the transparent proxy upon installation
This will create a Kubernetes resource in your cluster, pointing to the destination my-destination you created in the SAP BTP cockpit.
With the configuration above you are exposing a specific target system defined as a destination. Therefore, allowing communication to it from any pod within the namespace.
Keep in mind that this includes the destination configuration of any subscribed tenants, if they have defined a destination with the same name.
Make sure to secure your cluster accordingly to avoid any potential security risks. For more information on how to restrict access to the destinations refer to this document.
Create the following YAML file:
apiVersion: destination.connectivity.api.sap/v1
kind: Destination
metadata:
  name: gateway
spec:
  destinationRef:
    name: '*'
  destinationServiceInstanceName: dest-service-instance-example # can be ommited if config.destinationService.defaultInstanceName was provided to the helm chart of the transparent proxy upon installation
This will create a Kubernetes resource in your cluster, allowing you to create requests against arbitrary destinations.
With the configuration above you are exposing all destinations from the configured Destination service instance. Therefore, allowing communication to it from any pod within the namespace.
Keep in mind that this includes all destinations of all subscribed tenants.
Make sure to secure your cluster accordingly to avoid any potential security risks. For more information on how to restrict access to the destinations refer to this document.
Apply the YAML with kubectl apply -n into the namespace of your application pods to take effect.
Executing Requests
The SAP Cloud SDK offers two distinct approaches for executing requests through the Transparent Proxy in Kyma. Choose the approach that best fits your application's architecture and requirements.
TransparentProxyDestination Builder
The TransparentProxyDestination Builder approach provides explicit, fine-grained control over individual destination configurations.
When to Use This Approach
- You need specific control over individual destination configurations
- You want to set custom headers or properties per destination
- You prefer explicit destination management
- You want to consume a destination with fragment or chain
Implementation Examples
- Individual Destination
- Destination Gateway
For Concrete SAP Destinations:
Use this when connecting to a specific, pre-configured destination with a dedicated Destination Custom Resource.
TransparentProxyDestination destination = TransparentProxyDestination
    .destination(<destination-custom-resource-name>.<destination-custom-resource-namespace>)
    .header("X-Custom-Header", "custom-value")
    .property("some-property-key", "some-value")
    .build();

List<SalesArea> execute = new DefaultSalesAreaService().getAllSalesArea() // example OData request
        .execute(destination);
For Gateway:
Use this when you need to connect to arbitrary destinations dynamically using a Gateway Destination Custom Resource.
TransparentProxyDestination destination = TransparentProxyDestination
    .gateway("my-destination", <destination-custom-resource-name>.<destination-custom-resource-namespace>)
    .fragmentName("my-fragment")
    .build();

List<SalesArea> execute = new DefaultSalesAreaService().getAllSalesArea() // example OData request
        .execute(destination);
<destination-custom-resource-namespace> can be omitted if the destination custom resource is created in the same namespace as the application workload.
Register Transparent Proxy for destination access
This approach provides centralized proxy configuration where all destination requests are automatically routed through a single registered gateway without requiring explicit destination builders.
It works only for SAP Cloud SDKDestinationAccessor approach.
When to Use This Approach
- You want all destinations to automatically route through a single Dynamic Destination Custom Resource
- You prefer a centralized, "set-it-and-forget-it" configuration approach
- You have many destinations that should all use the same proxy configuration
- You want to minimize code changes when migrating from traditional destination access
- For CAP applications as CAP uses DestinationAccessor under the hood
Implementation Examples
Step 1: Register the Transparent Proxy (typically during application startup):
// Register with default port 80
TransparentProxy.register("<destination-gateway-host>");

// OR register with custom port
TransparentProxy.register("http://<destination-gateway-host>", 8080);

// OR register with provider tenant ID (default port 80)
TransparentProxy.register("<destination-gateway-host>", "provider-tenant-id");

// OR register with custom port and provider tenant ID
TransparentProxy.register("http://<destination-gateway-host>", 8080, "provider-tenant-id");
The provider tenant ID serves as a fallback when the current tenant cannot be accessed during destination preparation. This is particularly useful in scenarios where tenant information is not readily available, providing a default tenant for authentication and authorization purposes.
The SAP Cloud SDK automatically sets the current tenant ID during requests. The provider tenant ID is only used as a fallback when the current tenant cannot be accessed. For more information how the SAP Cloud SDK determines the current tenant, please refer here.
Step 2: For SAP Cloud SDKDestinationAccessor approach only - use destinations normally - they will automatically route through the registered proxy:
// All subsequent destination requests will be routed through the registered gateway
// No explicit TransparentProxyDestination creation needed
Destination destination = DestinationAccessor.getDestination("my-destination");

List<SalesArea> execute = new DefaultSalesAreaService().getAllSalesArea() // example OData request
        .execute(destination);
Both approaches support destinations of any proxy type including ON_PREMISE and INTERNET destinations.
Troubleshooting
When using proxy servers it can be difficult to troubleshoot issues as it is often not obvious where exactly the error occurred. For example, with the Transparent Proxy errors might occur on the target system (e.g. OData service), the Destination Service or the Transparent Proxy itself.
To make troubleshooting easier the Transparent Proxy adds additional response headers to provide more information about where an error occurred. For the above example of executing OData requests you can access the response headers as follows:
try {
    // execute OData request
} catch (ODataResponseException e) {
    System.out.println(e.getHttpCode());
    // the Transparent Proxy will attach additional response headers in case an error occurred
    System.out.println(e.getHttpHeaders());
}
List of headers added by the Transparent Proxy
X-Error-Origin- the source of the errorX-Proxy-Server- the proxy server (Transparent Proxy)X-Error-Message- thorough error messageX-Error-Internal-Code- set only when the source of the error is the XSUAA or Destination service. The value is the HTTP code returned from one of these services.X-Request-Idis sent with the response in all requests, both successful and failed