Kyma is an open source project, that offers a comprehensive suite of tools and services, specifically created for the development and operation of cloud-native applications seamlessly integrated with Kubernetes.
Getting Started with the SAP Cloud SDK on Kyma
This guide helps you migrate your existing application, built with the SAP Cloud SDK for JavaScript, to Kyma. The reference application we will use in this guide can be found in the samples repository. We will also deploy an approuter so that only authenticated users can access the application.
Prerequisites
-
Install
dockerand ensure access to a publicly reachable Docker repository.infoA Kubernetes cluster uses a secret to authenticate with a container registry to pull an image. For that, you will need to configure a secret in your cluster:
kubectl create secret docker-registry regcred --docker-server=YOUR_DOCKER_SERVER --docker-username=YOUR_DOCKER_USERNAME --docker-password=YOUR_DOCKER_PASSWORD --docker-email=YOUR_DOCKER_EMAIL -
An SAP BTP Kyma instance created in your subaccount
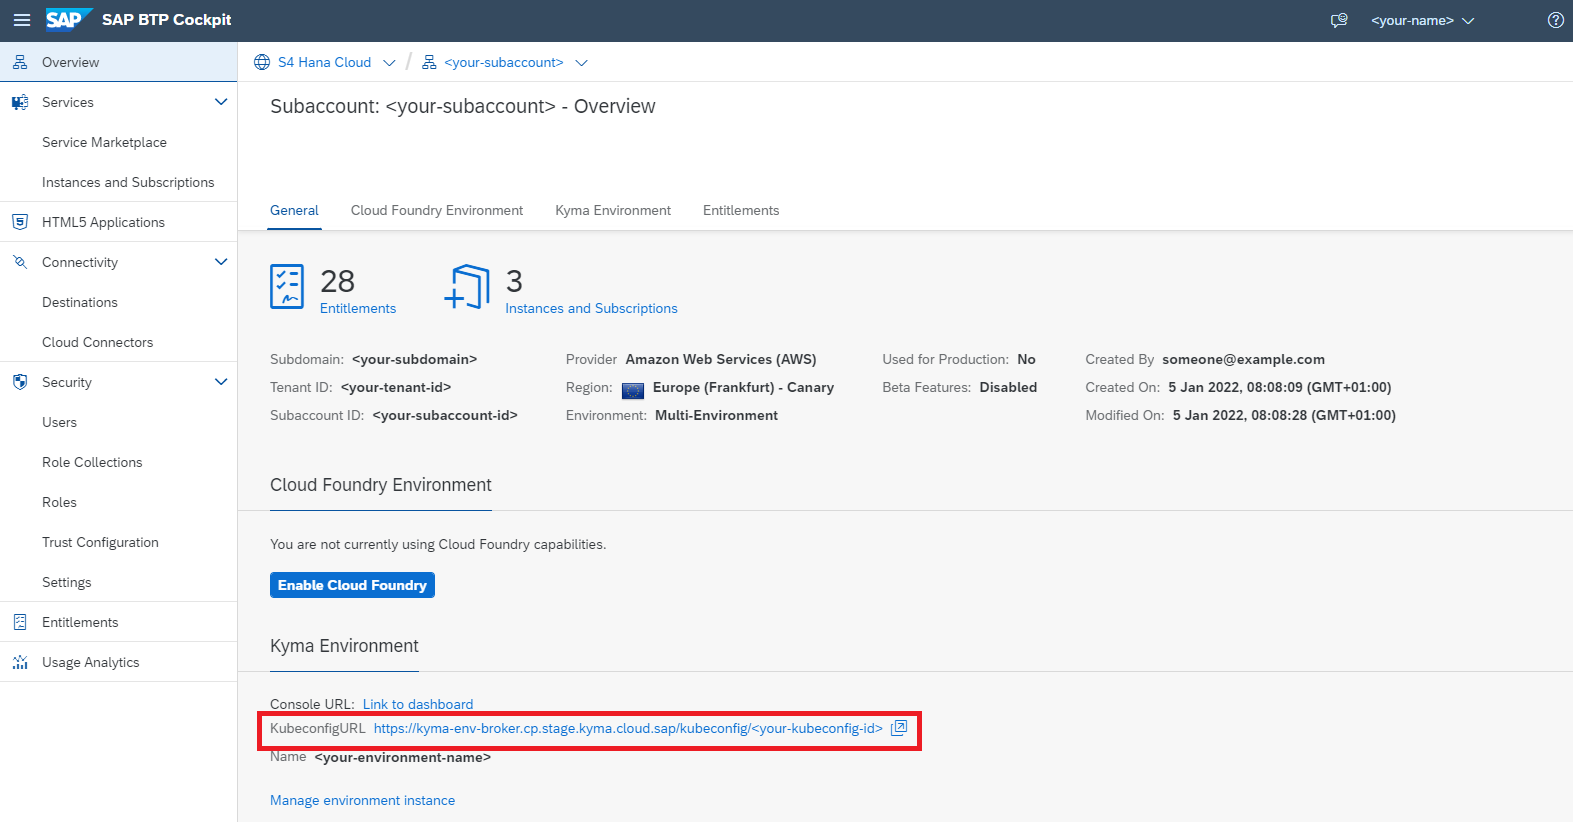
infoIf you do not have an existing Kyma instance, follow the documentation to create one. Once your Kyma environment is created, download the Kubeconfig file directly from the SAP BTP cockpit.
-
kubectlconfigured to work with your SAP BTP, Kyma runtime instance -
helm, a package manager for KubernetesinfoThis guide assumes you have installed the Helm client and know how to configure and use Helm Charts.
If you are using the example application from the SAP Cloud SDK Samples repository, you can use the existing Helm package and don't need to create all the files again. Otherwise, use the code snippets given in this guide as reference and adjust the values according to your application.
-
A Node.js application using the SAP Cloud SDK and an approuter
infoIf you do not have an application yet, you can use the example application and approuter.
Create and Bind SAP BTP Services
Now that the service operator is running in your cluster, you can create services just like you would do in SAP BTP CF, but instead of the SAP BTP cockpit, you'll use YAML service definitions. For this guide, we'll assume the application uses two services:
- Destination Service
- XSUAA Service
Bind the Destination Service
- Create
yamlfiles for the destination service instance and binding:
apiVersion: services.cloud.sap.com/v1alpha1
kind: ServiceInstance
metadata:
  name: operator-destination-service
spec:
  serviceOfferingName: destination
  servicePlanName: lite
apiVersion: services.cloud.sap.com/v1alpha1
kind: ServiceBinding
metadata:
  name: operator-destination-service
spec:
  serviceInstanceName: operator-destination-service
- Install the configuration using the commands:
kubectl apply -f operator-destination-service.yml
kubectl apply -f operator-destination-binding.yml
This should create a Kubernetes secret named operator-destination-service.
This secret will contain the actual service binding information.
- Monitor the status via
kubectl describe ServiceInstance operator-destination-service.
Bind the XSUAA Service
Create yaml files for the XSUAA service instance and binding:
apiVersion: services.cloud.sap.com/v1alpha1
kind: ServiceInstance
metadata:
  name: operator-xsuaa-service
spec:
  serviceOfferingName: xsuaa
  servicePlanName: application
  parameters:
    xsappname: kubernetes-xsuaa
    tenant-mode: shared
    scopes:
      - name: '$XSAPPNAME.Callback'
        description: 'With this scope set, the callbacks for tenant onboarding, offboarding and getDependencies can be called.'
        grant-as-authority-to-apps:
          - $XSAPPNAME(application,sap-provisioning,tenant-onboarding)
    role-templates:
      - name: TOKEN_EXCHANGE
        description: Token exchange
        scope-references:
          - uaa.user
      - name: 'MultitenancyCallbackRoleTemplate'
        description: 'Call callback-services of applications'
        scope-references:
          - '$XSAPPNAME.Callback'
    oauth2-configuration:
      grant-types:
        - authorization_code
        - client_credentials
        - password
        - refresh_token
        - urn:ietf:params:oauth:grant-type:saml2-bearer
        - user_token
        - client_x509
        - urn:ietf:params:oauth:grant-type:jwt-bearer
      # Allowed redirect URIs in case you want to use an approuter behind an ingress for user login
      redirect-uris:
        - https://*/**
apiVersion: services.cloud.sap.com/v1alpha1
kind: ServiceBinding
metadata:
  name: operator-xsuaa-service
spec:
  serviceInstanceName: operator-xsuaa-service
- Repeat steps 2 and 3 from the previous section for the XSUAA service.
Replace
destinationwithxsuaa.
We will see how to mount the created secrets into the file system of the application in the deployment configuration step.
Notice that the metadata -> name property can be anything you want.
In this case, it's operator-destination-service.
Make sure it matches exactly to the spec -> serviceInstanceName field in the binding.
Containerize the Application
Create a Dockerfile defining a container for your application.
Then it can be deployed to one or more Kubernetes Pods.
FROM node:14-alpine

WORKDIR /workdir

COPY /deployment /workdir

RUN ["npm", "install", "--unsafe-perm"]

EXPOSE 3000
CMD ["npm", "run", "start:prod"]
Compile and push the image by running:
docker build -t <YOUR_REPO>/<YOUR_IMAGE_NAME>:<YOUR_TAG> .
docker push <YOUR_REPO>/<YOUR_IMAGE_NAME>:<YOUR_TAG>
Create a Kyma Deployment using Helm Charts
Instead of creating one deployment.yml configuration file for all your resources, you will create a Helm Chart that will contain all of the resource definitions necessary to run your application inside of a Kyma cluster.
A chart, that describes our example application and approuter is stored as a collection of files inside of k8s-e2e-app-helm directory as shown below.
For a deeper overview of Helm Charts, refer to the development guide.
In this section, we'll look into the chart configurations for the following:
- application,
- approuter,
- and the API gateway
Application
Create the following files inside the app-chart folder:
Chart.yaml: information about the chartvalues.yaml: the default configuration values for this charttemplates\configmap.yaml: storedatain key-value pairs. Will be consumed as environment variables indeployment.yamltemplates\deployment.yaml: deployment configurationtemplates\service.yaml: a Service to expose the approuter
- values.yaml
- Chart.yaml
- configmap.yaml
- deployment.yaml
- service.yaml
image:
  repository: <YOUR_REPO>/k8s-e2e-app:latest # replace <YOUR_REPO> with your Docker repository
  tag: latest
resources:
  requests:
    memory: '256Mi'
    cpu: '500m'
  limits:
    memory: '512Mi'
    cpu: '1000m'
apiVersion: v2
name: app-chart
description: A Helm chart for Kubernetes

# A chart can be either an 'application' or a 'library' chart.
#
# Application charts are a collection of templates that can be packaged into versioned archives
# to be deployed.
#
# Library charts provide useful utilities or functions for the chart developer. They're included as
# a dependency of application charts to inject those utilities and functions into the rendering
# pipeline. Library charts do not define any templates and therefore cannot be deployed.
type: application

# This is the chart version. This version number should be incremented each time you make changes
# to the chart and its templates, including the app version.
# Versions are expected to follow Semantic Versioning (https://semver.org/)
version: 0.1.0

# This is the version number of the application being deployed. This version number should be
# incremented each time you make changes to the application. Versions are not expected to
# follow Semantic Versioning. They should reflect the version the application is using.
# It is recommended to use it with quotes.
appVersion: '1.0.0'
apiVersion: v1
kind: ConfigMap
metadata:
  name: {{ include "app-chart.fullname" . }}-config
data:
  cloud_destination: {{ .Values.cloudDestination | quote }}
  onpremise_destination: {{ .Values.onPremiseDestination | quote }}
  principal_propagation_destination: {{ .Values.principalPropagationDestination | quote }}
apiVersion: v1
kind: Service
metadata:
  name: {{ include "app-chart.fullname" . }}-svc
  labels:
    {{- include "app-chart.labels" . | nindent 4 }}
spec:
  ports:
    - port: 8080
      targetPort: 3000
  selector:
    {{- include "app-chart.selectorLabels" . | nindent 4 }}
Configure approuter
Package the application router as a docker image so that it can run in Kubernetes, refer to the documentation for configuration details.
Refer to the prerequisites if you need to create an simple approuter.
Create the same files as described in the section above in the approuter-charts folder:
- values.yaml
- Chart.yaml
- configmap.yaml
- deployment.yaml
- service.yaml
xsuaaBinding:
  config:
    idp:
    pattern:
  image:
    repository: <YOUR_REPO>/k8s-approuter:latest # replace <YOUR_REPO> with your Docker repository
    tag: latest
  resources:
    requests:
      memory: '256Mi'
      cpu: '500m'
    limits:
      memory: '512Mi'
      cpu: '1000m'
apiVersion: v2
name: approuter-chart
description: A Helm chart for Kubernetes

# A chart can be either an 'application' or a 'library' chart.
#
# Application charts are a collection of templates that can be packaged into versioned archives
# to be deployed.
#
# Library charts provide useful utilities or functions for the chart developer. They're included as
# a dependency of application charts to inject those utilities and functions into the rendering
# pipeline. Library charts do not define any templates and therefore cannot be deployed.
type: application

# This is the chart version. This version number should be incremented each time you make changes
# to the chart and its templates, including the app version.
# Versions are expected to follow Semantic Versioning (https://semver.org/)
version: 0.1.0

# This is the version number of the application being deployed. This version number should be
# incremented each time you make changes to the application. Versions are not expected to
# follow Semantic Versioning. They should reflect the version the application is using.
# It is recommended to use it with quotes.
appVersion: '1.0.0'
apiVersion: v1
kind: ConfigMap
metadata:
  name: {{ include "approuter-chart.fullname" . }}-config
data:
  {{- if .Values.config.idp }}
  xs-app.json: {{ printf "{\"welcomeFile\":\"/web-pages/index.html\",\"routes\":[{\"source\":\"/backend-app/(.*)\",\"target\":\"$1\",\"destination\":\"backend\",\"identityProvider\":\"%s\"},{\"source\":\"/web-pages/(.*)\",\"target\":\"$1\",\"localDir\":\"static-resources\",\"identityProvider\":\"%s\"}]}" .Values.config.idp .Values.config.idp | toPrettyJson }}
  {{- else }}
  xs-app.json: {{ .Values.config.json | toPrettyJson | quote }}
  {{ end -}}
apiVersion: v1
kind: Service
metadata:
  name: {{ include "approuter-chart.fullname" . }}-svc
  labels:
    {{- include "approuter-chart.labels" . | nindent 4 }}
spec:
  ports:
    - port: 8080
      targetPort: 5000
  selector:
    {{- include "approuter-chart.selectorLabels" . | nindent 4 }}
Expose the approuter with an API Rule
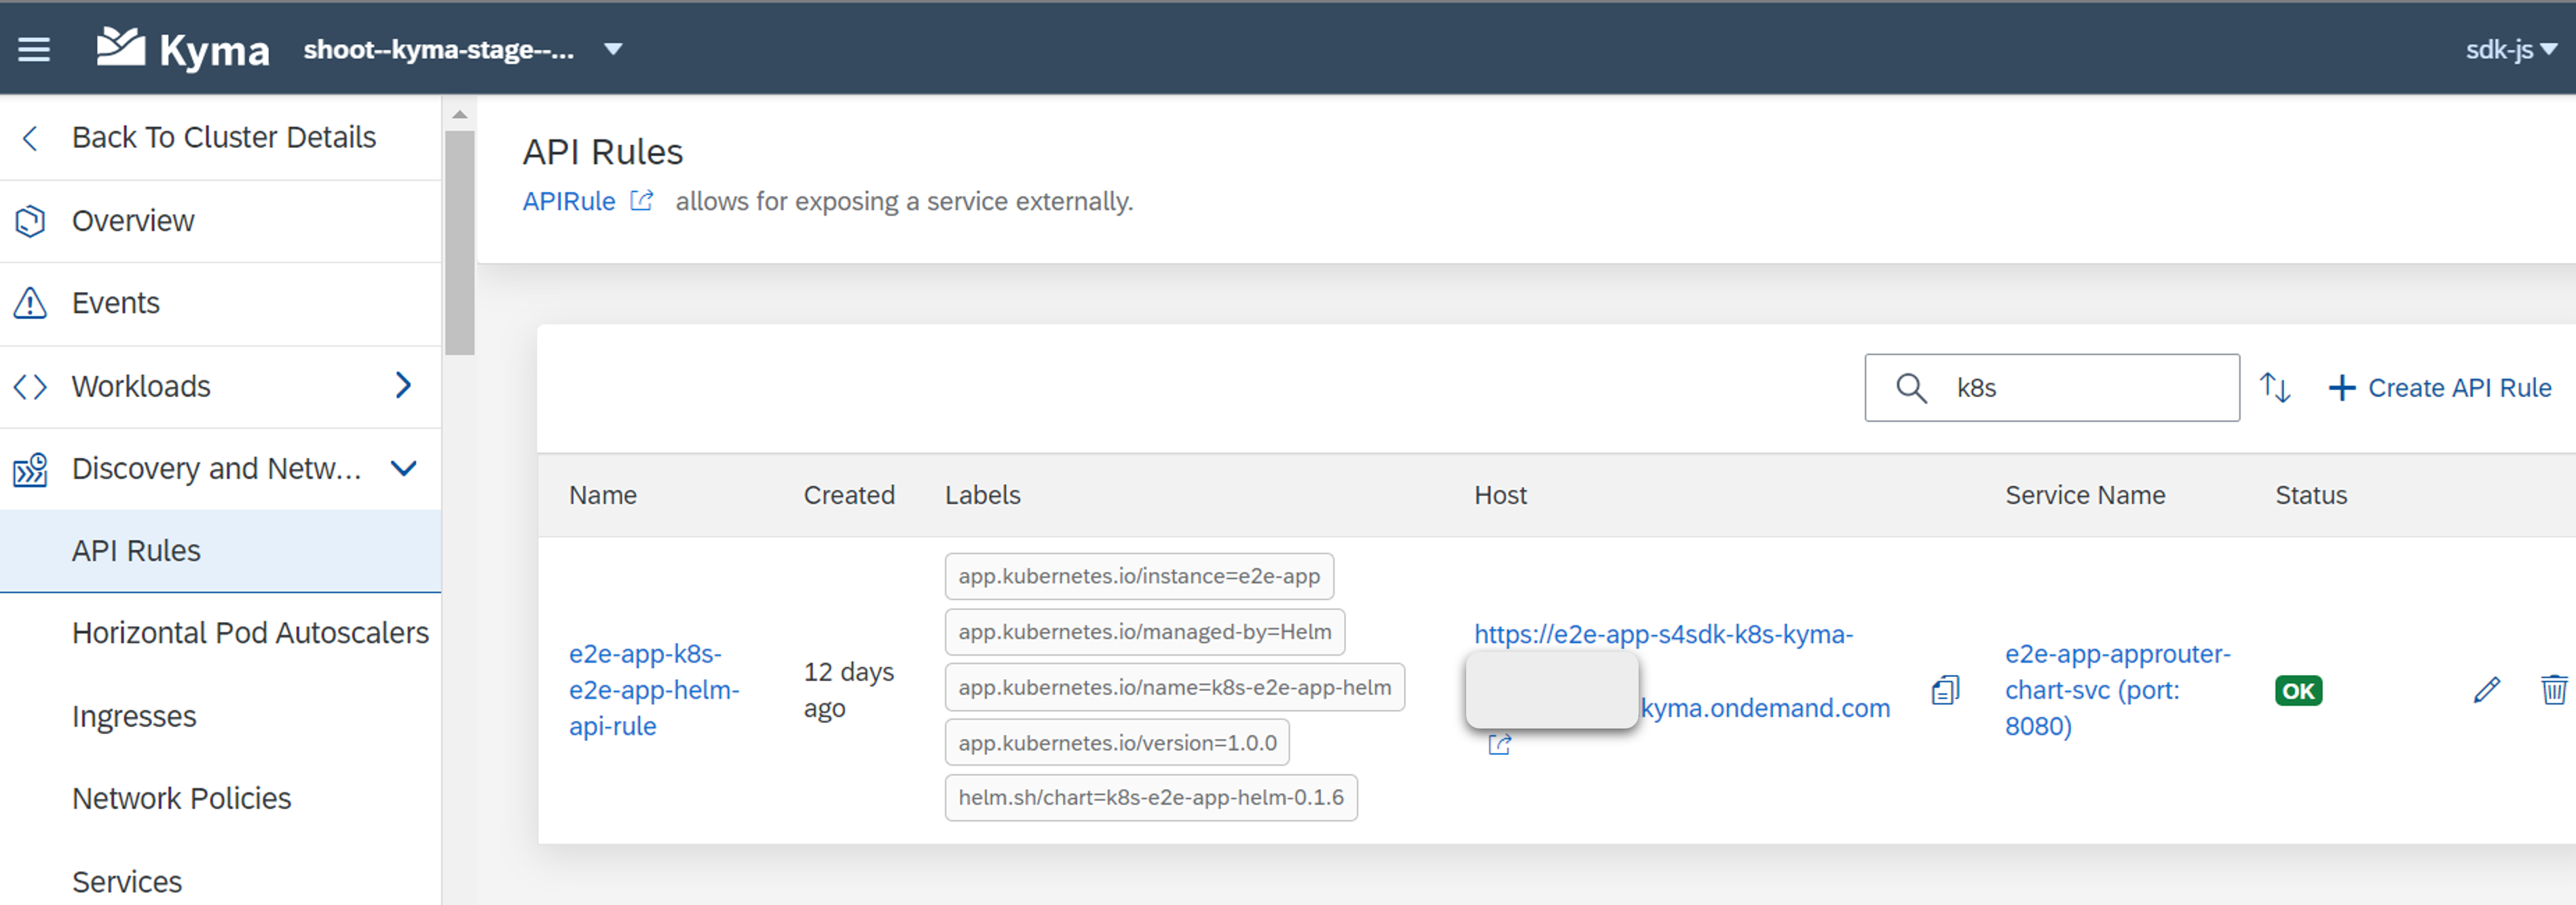
To make the approuter accessible outside of the Kyma cluster, you must expose it using an API Gateway.
This can be done by creating an API Rule.
Create a file named api-gateway.yaml inside the templates folder with the following content:
{{- if and (.Values.expose.enabled) (eq .Values.expose.environment "kyma") -}}
{{- $name := default "approuter-chart" .Values.nameOverride | trunc 63 | trimSuffix "-" -}}
{{- $fullName := include "k8s-e2e-app-helm.fullname" . -}}
{{- $svcName := index .Values "approuter-chart" "name" | default (printf "%s-%s-svc" .Release.Name $name) | trunc 63 | trimSuffix "-" | quote -}}
{{- $svcPort := dig "approuter-chart" "service" "port" 8080 (.Values | merge (dict)) -}}

apiVersion: gateway.kyma-project.io/v1beta1
kind: APIRule
metadata:
  name: {{ $fullName }}-api-rule
  labels:
    {{- include "k8s-e2e-app-helm.labels" . | nindent 4 }}
spec:
  gateway: kyma-gateway.kyma-system.svc.cluster.local
  host: {{ index .Values.expose "api-rule" "host" }}
  service:
    name: {{ $svcName }}
    port: {{ $svcPort }}
  rules:
    - path: /.*
      methods:
        - GET
        - POST
        - DELETE
      mutators: []
      accessStrategies:
        - handler: noop
          config: {}

{{- end }}
Finally, package and deploy all your resources together using the Helm charts created above. Run the below command:
helm package <HELM_CHART_DIRECTORY_PATH> --version v<VERSION_NO> # e.g. v1.0.0
helm install e2e-app <PATH_TO_PACKAGED_HELM_CHART>
Access your Application
You can view the created resources (application, API rule, etc) by navigating to the Kyma dashboard, using the Link to dashboard link in the subaccount. Verify the resources and choose the host link to open the application in your browser.
You should be redirected to the login page of your IdP, if you have configured an approuter.
On-Premise Connectivity
Prerequisites
This guide assumes you have both the Transparent Proxy (version >= 1.4.0) and Connectivity Proxy (version >= 2.11.0) installed in your cluster.
For Kyma the Transparent Proxy is available as a module that can be enabled as described here.
The Connectivity Proxy can be installed as described here.
Background Information
When using the Transparent Proxy your app performs requests against the Transparent Proxy without explicit authentication, relying on the secure network communication provided by Kyma via Istio. The Transparent Proxy will obtain the relevant destination from the destination service and use it to forward the request via the Connectivity Proxy to the On-Premise system. Consequently, your app itself does not interact with destination or connectivity service at all and thus your application pods do not require bindings to these two services.
Please note that the current implementation of the Transparent Proxy does not yet cover all use cases.
Constraints when using the Transparent Proxy
- Private Link not yet supported
This approach is conceptually different from what you may be used to from a Cloud Foundry environment. The official documentation of the Transparent Proxy gives more information on the architecture.
Create a Kubernetes Resource
For the creation of the necessary Kubernetes Resources, please refer to our Java documentation.
Executing Requests
In your application you can now configure a destination to execute requests:
- Individual Destination
- Dynamic Destinations
import {
  registerDestination,
  getTenantId,
  retrieveJwt
} from '@sap-cloud-sdk/connectivity';

const destination = {
  name: 'registered-destination',
  url: 'http://my-destination.namespace/'
  // for principal propagation make sure to set the forwardAuthToken flag to true:
  // forwardAuthToken: true
};
await registerDestination(destination, options);

const result = await myEntityApi
  .requestBuilder()
  .getAll()
  // for a subscriber tenant make sure to send the tenant header:
  // .addCustomHeaders({ 'X-Tenant-Id': getTenantId(retrieveJwt(request)) })
  .execute({ destinationName: 'registered-destination' });
// for principal propagation make sure the send the auth token:
// .execute({ destinationName: 'registered-destination', jwt: retrieveJwt(request) });
import {
  registerDestination,
  getTenantId,
  retrieveJwt
} from '@sap-cloud-sdk/connectivity';

const destination = {
  name: 'registered-destination',
  url: 'http://dynamic-destination.namespace/'
  // for principal propagation make sure to set the forwardAuthToken flag to true:
  // forwardAuthToken: true
};
await registerDestination(destination, options);

const result = await myEntityApi
  .requestBuilder()
  .getAll()
  .addCustomHeaders({ 'X-Destination-Name': '<CF-DESTINATION-NAME>' })
  // for a subscriber tenant make sure to send the tenant header:
  // .addCustomHeaders({ 'X-Tenant-Id': getTenantId(retrieveJwt(request)) })
  .execute({ destinationName: 'registered-destination' });
// for principal propagation make sure the send the auth token:
// .execute({ destinationName: 'registered-destination', jwt: retrieveJwt(request) });
- Replace
namespacein the URL with the namespace you installed the Transparent Proxy into.
The code above shows an example how you can then use the destination object to perform an OData request against the system.
The above approach is not limited to destinations of proxy type ON_PREMISE, INTERNET destinations are supported as well.
Troubleshooting
When using proxy servers it can be difficult to troubleshoot issues as it is often not obvious where exactly the error occurred. For example, with the Transparent Proxy errors might occur on the target system (e.g. OData service), the Destination Service or the Transparent Proxy itself.
To make troubleshooting easier the Transparent Proxy adds additional response headers to provide more information about where an error occurred. For the above example of executing OData requests you can access the response headers as follows:
const result = await myEntityApi
  .requestBuilder()
  .getAll()
  .execute('registered-destination')
  .catch(err => {
    console.error('Error Headers:', err.rootCause?.response?.headers);
  });
List of headers added by the Transparent Proxy
X-Error-Origin- the source of the errorX-Proxy-Server- the proxy server (Transparent Proxy)X-Error-Message- thorough error messageX-Error-Internal-Code- set only when the source of the error is the XSUAA or Destination service. The value is the HTTP code returned from one of these services.X-Request-Idis sent with the response in all requests, both successful and failed